Recording with an SLR Camera
Dr. Srivastava notes that taking high-resolution video using a digital single-lens reflex camera connected to your surgical microscope can be far less expensive than using a standard video camera. “Most of the new digital SLRs have HD digital recording capability,” he says. “Some, like Sony’s a7R II, have 4K recording ability as well. A full-frame DLSR camera costs about $2,000; a ballpark cost for the video mount to connect it to your microscope is $1,500 to $2,000 if you buy it directly from the microscope manufacturer, and less-expensive off-brand mounts are available as well. That means you’re investing about $4,000 for the whole setup, which is a third of what you might pay for a full-HD video camera with a C-mount [the connector that joins the beam-splitter of the operating microscope to the camera].
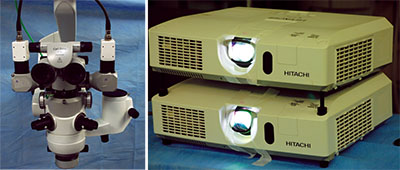 |
Above, left: Two similar cameras mounted on either side of a microscope’s beam splitter using video adapter tubes of the same focal length. Above, right: Two stackable projectors with their projected images aligned. A pair of polarized eyeglasses has been broken in half, with one lens placed in front of each projector’s lens to polarize the projected images. |
“Once the SLR is plugged in, you can record directly onto the SLR camera, or you can use the camera’s live video-out port to export the video onto another device such as a computer with a video capture card or a digital recorder,” he says. “File size is limited on a camera, but a separate recording device should allow you to record streaming video for as long as you want—maybe a two- or three-hour surgery, for example.
“If you’re using a computer, you’ll need a good video-capture card, such as the one made by Blackmagic Design,” he adds. “The card goes into a PCI slot on the motherboard; because it’s directly connected to the motherboard it doesn’t lose any frames and produces a high-quality video. You also can choose the compression, file size and format you want, such AVI or PAL. Most of these capture cards can take video input from any camera.”
Using Your Smartphone
Another option is recording a surgical video using your smartphone. “There are many free apps available through the Android store and Apple App store that will allow you to do the recording,” he notes. “The special features of these newer phones can also be used: We’ve used an iPhone’s slow-motion mode to capture the stages of phaco and phacodonesis.
“Unlike an SLR or other camera, you can’t mount a smartphone on your microscope’s beam splitter,” he continues. “To do that, the microscope would need a video adapter tube. However, a smartphone can be mounted on an assistant’s viewing scope, which most microscopes have. To do this, you can use any adapter for a smartphone that’s available off the rack, such as one designed for slit lamp attachment; some ophthalmic companies also make them, and one person in India designed a mount you can make at home for $10 to $15.” (Instructions for making one are available on the website of the Journal of Mobile Technology in Medicine at http://www.journalmtm.com/2014/diy-smartphone-slit-lamp-adaptor/)
Dr. Srivastava notes that it can be tricky to export live video from a smartphone. “Most of these phones have an attachment that allows you to duplicate the phone’s screen on a smart TV or computer screen,” he says. “This is called screen mirroring. If you don’t have a computer available, you can insert an Android Dongle into your TV’s HDMI port to allow it to mirror the smartphone screen. With an iPhone, you can use Apple TV.”
Working Live in 3-D
Dr. Srivastava says it’s possible to do both 3-D recording and live 3-D video displays without investing in expensive equipment. “All 3-D videos work the same way,” he explains. “Your left eye sees one image while your right eye sees a similar but slightly different image; your mind fuses them to create a perception of depth. When you mount one camera on the left side of a beam splitter and another camera on the right side, you’re capturing slightly dissimilar images, like those your eyes perceive. These two images can then be sent to two different projectors. By polarizing the light emitted by each projector, you can throw two different images with different polarizations onto a silver polarized screen. Then a viewer can use polarized glasses to see very good 3-D images—better quality than what you’d see at the movies.
“To do this, you need two identical cameras with identical video adapter tubes so the optics are the same,” he continues. “To project the resulting images, you need two projectors, referred to as stackable projectors. Most multimedia companies use stackable projectors to increase the brightness of their presentations. In this case, you run the video from the left side of the beam splitter through one projector and the video from the right side through the other projector.”
Dr. Srivastava explains how polarization makes 3-D viewing possible. “When you watch 3-D movies, each lens in the glasses you wear has a different polarization,” he says. “If the left eye has a vertical polarization, the right eye will have a horizontal polarization. As a result, your left eye will only see things that are vertically polarized, and your right eye will only see things that are horizontally polarized. Now, if you polarize the light coming from each projector differently, the left eye will see only one of the two images and the right eye will see only the other.
“Accomplishing this is easy; just order some 3-D glasses,” he continues. “Break one pair in half and place the left lens in front of the first projector and the right lens in front of the second projector. That will polarize the light from each projector in a different direction. Then, when you wear that same type of 3-D glasses and watch the video, you’ll see the video in 3-D.”
Dr. Srivastava adds that this will only work if you project the two images onto a silver screen. “A silver screen will reflect the polarization back; a white screen will just absorb the polarization, causing you to see both images in both eyes,” he says. “Silver screens are readily available; mine was shipped from China, from aliexpress.com, a big, online shopping portal. It cost less than $800 dollars. I also ordered my 3-D glasses from that site.”
Recording in 3-D
“Recording your surgery in 3-D is a little different, but it’s not complicated,” says Dr. Srivastava. “Your recording device needs to have a 3-D capture card. Instead of projecting the video, you send the two video feeds to the video capture card; it simultaneously records both the left and right views of the surgery. Once completed, you’ll have a large digital file; the software will then let you send the left image to one projector and the right image to the other. A 3-D capture card costs about $1,500, but other than the computer itself—which needs to have a good processor that can buffer a large video file—that’s the only added expense. In my experience, as with a standard video card, the best 3-D video capture card is the one available from Blackmagic Design.
“To project the surgery recording, you just need to connect your computer to the two projectors, as described above,” he concludes. “If you want to view the video in 3-D on your computer screen, you’ll need a special 3-D monitor.” REVIEW