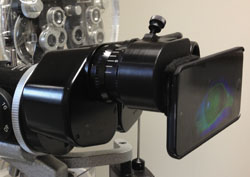
The System
Stephen Pflugfelder, MD, the James and Margaret Elkins Chair of ophthalmology at Baylor, and his corneal fellow Christian Hester, MD, say there are several keys to achieving the best images at the slit lamp with an iDevice, which in their case began with the iPod Touch.
• Maximum megapixels. “We’ve been comparing the iPod Touch and the iPhone 4S, and we’ve found you want at least a 5-megapixel camera,” says Dr. Hester. “You’ll notice an increase in the camera’s sharpness with more megapixels, and an improvement in the camera’s optics, as well.” He says the Samsung Galaxy’s camera actually has more megapixels than the iPhone, but the trade-off is that it doesn’t have software that can enhance the camera’s exposure to achieve optimal imaging of the ocular surface.
• A good adapter. The adapter is the interface by which the iPod/iPhone attaches to the slit lamp. Dr. Hester says they use an adapter from EyePhotoDoc ( eyephotodoc.com), which was designed by Clifford Terry, MD. “It slides on easily,” says Dr. Hester. “I’ve used a number of different adapters, and imaging is a more pleasurable experience when you have the right one.” Other adapters are available from Keeler ( keelerusa.com), Tiger Lens ( tigerlens.com) and Zarf Enterprises ( zarfenterprises.com).
• Illumination, the ProCamera app and a filter. “Initially, I was taking terrible pictures that didn’t look like the images in the texts,” recalls Dr. Hester. “But then I realized it all had to do with the lighting, which is important to optimize.
|
In terms of a light source for staining evaluation, the physicians’ Haag-Streit slit lamp has what they need. “We played around with various light sources but, in the end, found that you can actually get good images with the standard cobalt blue light that’s on the Haag-Streit slit lamp that we use,” says Dr. Hester. “We then optimize the lighting in the ProCamera app.” Putting these elements together cost the ophthalmology department about $600 to $700.
Getting the Best Shots
As with anything, you can assemble the best equipment but you need hands-on experience to make the most of it.
“We’ll use some slit lamps where we have to turn up the light intensity a little bit, and others where you don’t need such an intense light source,” explains Dr. Hester. “But the ProCamera app lets you compensate for the variations among the slit lamps in your clinic by moving the yellow exposure circle around on the screen to get the optimum lighting. You don’t have to enter a numeric value—it’s all done visually. So, when the image looks right, you tap the circle to keep that exposure. We literally tried 15 to 20 apps before finding this one that makes it that simple.”
For traditional, white-light photography at the slit lamp, Dr. Hester says illumination looms large again. “To get an image of the entire eye, you need an external illumination source,” he says. “You can get one of these from your slit lamp manufacturer, and EyePhotoDoc also makes one. However, what I do 90 percent of the time is just hold a transilluminator next to the slit lamp and illuminate the eye with that.
“Also, Dr. Pflugfelder showed me that you can get a nice overall image of the eye using a diffuser,” Dr. Hester continues. “You can get a pack of five diffusers for $50 or so, and using one really softens the light and makes for a good overview picture of the eye. And, if you want that classic image in which the entire eye is visible with a thin slit beam on it and there’s diffuse illumination, you hold up the transilluminator and use a thin light slit on medium intensity oriented between a 30- and 60-degree angle.” The physicians say that diffusers are available from their slit-lamp company’s website, but, in a pinch, a piece of translucent scotch tape or a piece of 3M Transpore surgical tape placed over the slit-lamp mirror can also work.
|
The other key element is focusing the image. “This is one of the things that drives people crazy when they first start taking slit-lamp photos,” says Dr. Hester. “What works best is using the blue focus square in ProCamera. You use your finger to move the blue square over what you want to focus on and, once it’s there, you lock the focus. You can then control fine adjustments to the focus using the slit lamp as you would normally during an exam. Using this method, with a thin slit beam on the high-intensity setting and a 60-degree angle, we’ve been able to capture the posterior capsule, which is about 5 to 10 µm thick. The precision you can attain with the focus is amazing.”
Studying the System
Drs. Pflugfelder and Hester, along with their colleague Mitchell Weikert, MD, used the iPod/slit-lamp system for a study of ocular surface grading that they presented at the 2012 meeting of the American Society of Cataract and Refractive Surgery, and say they achieved intriguing results.
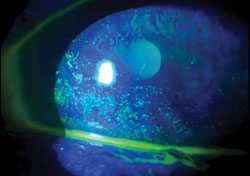
“Our goal for the study was to determine if we could take images with an iDevice, in this case the iPod Touch, and grade the severity of corneal fluorescein staining, tear-film breakup time and lissamine green staining compared to their grading in real time at the slit lamp by a physician,” says Dr. Pflugfelder. “If the grading corresponded, we knew that someone could capture the images and video at a remote site and send them to a reading center where they could be anonymously graded by a reader. So, one of us graded the staining at the slit lamp and captured the staining video from 14 patients, then a naïve reviewer would evaluate the video and images and grade them.”
|
In addition to its use at centralized reading centers, the physicians say such a system could provide other benefits. “I receive e-mails from India on a regular basis, and have talked with others involved with international ophthalmology,” says Dr. Hester. “After speaking with them I think this could serve as an important resource for areas that can’t afford to install a $5,000 or $6,000 camera. The other thing is that it’s portable. Instead of having to move patients to the room with the imaging system in it, you can put this in your pocket and carry it to your exam rooms.”
Dr. Pflugfelder says it’s allowed care to be more convenient for some of his patients, as well. “We practice in Houston, so we have a wide referral area,” he says. “Some patients live four to five hours away. In some instances, these far-off patients would call in with an eye problem such as irritation or redness, and Dr. Hester would have them take images of their eyes with their phones and e-mail them to us. This has saved patients a long trip on a number of occasions.”
Ultimately, Dr. Hester says that taking the time to clear the relatively short learning curve can pay off. “I used to try to take pictures at the slit lamp with a digital SLR camera and couldn’t do a very good job,” he says. “This makes it easier, but just because it’s an iPhone it’s not magic, and won’t make you automatically start taking amazing photos. It still takes work, but I think it takes a whole lot less work, and less photographic knowledge, than trying to do it with traditional slit-lamp photography.” REVIEW