I began performing canaloplasty in the summer of 2007. At the time, it wasn’t always clear what the specific goal of each step of the procedure was. When performing trabeculectomy, we knew what we were trying to achieve—for example, to create a certain flap thickness, width and length, and to generate a specific flow rate—but with canaloplasty, those kinds of specifics were still being established.
Since then, those of us performing the procedure have learned a great deal and refined the procedure considerably. Here, I’d like to share some of what I’ve learned, to aid others who may be considering adding canaloplasty to their armamentarium.
How Canaloplasty Works
The basic canaloplasty procedure is done as follows: The surgeon creates a half-thickness triangular or parabolic scleral flap, followed by a deep scleral flap that exposes and unroofs Schlemm’s canal and creates a Descemet’s window. The deep flap is excised and removed. A 250-µm catheter with a fiber optic light and lumen (for injection of viscoelastic) on its end is inserted into Schlemm’s canal; the catheter is gently passed around the circle until the tip emerges on the other side. (Passing the probe through Schlemm’s canal helps to break the septa inside the canal, and the viscodilation expands the canal.) A suture is then tied to the catheter. As the catheter’s direction is reversed and it’s pulled out of the canal, the suture replaces it. The suture is then tied tightly enough to stent the canal open. Finally, the superficial scleral flap and conjunctiva are closed so as to be watertight.
Initially, I needed to see for myself that a blebless surgery could meaningfully lower intraocular pressure. That was an important hurdle to get over. Today, I’ve had patients with no bleb and pressures of 10 mmHg postop, but the majority of my patients achieve pressures in the mid-teens. A percentage still end up needing some medication, but with materially improved IOP.
 One issue that has added to the challenge of refining canaloplasty is that the exact mechanism of action is still unknown. It’s well-established that the procedure lowers IOP in most patients, with fewer potential complications than trabeculectomy (most notably, an absence of hypotony-related complications); but it’s not yet clear which of several structural alterations made during the procedure is responsible for the drop in pressure in each individual patient.
Canaloplasty’s purported mechanism of action is that it creates flow through the Descemet’s window into a subscleral lake, ultimately allowing flow to go into the cut ends of Schlemm’s canal, around the canal 360 degrees, into the collector channels and back into the episcleral venous system. The stenting suture helps to keep Schlemm’s canal open, so the flow can get into it and travel around it as easily as possible. In actuality, however, it’s difficult to know what is taking place in an individual patient. It would be nice to have a way to image and quantify the flow of aqueous from its production in the ciliary body until it ultimately enters the episcleral venous system, but that’s not possible at the moment.
Taking It Step by Step
Let’s review the details—including potential concerns and pitfalls—of each step of the canaloplasty procedure, beginning with making the superficial and deep scleral flaps. The superficial scleral flap should resemble the thickness of a traditional trabeculectomy flap—basically a half-thickness flap. This is important in all cases as a way to avoid bleb formation. It’s especially important when one needs to convert to trabeculectomy. In that situation it’s difficult to avoid hypotony if the superficial flap is too thin.
 |
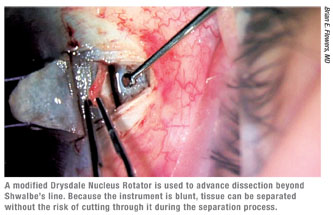
Assuming that you’ve started at the correct depth, as you tunnel forward toward the cornea while making the deep scleral flap you’ll eventually unroof Schlemm’s canal and start to see the trabecular meshwork. Once you expose Schlemm’s canal, it’s helpful to use blunt dissection to carry the dissection further into the cornea. The modified Drysdale nucleus rotator (Rhein Medical) has made this step much simpler and easier to perform. (See figure, above.) In the past, we had to carry forward the dissection using the crescent knife, which was one of the trickiest parts of the procedure. Separating the corneal stroma from the underlying Descemet’s by blunt dissection allows the surgeon to lift the stroma off of the underlying Descemet’s. Then the surgeon can carry forward the dissection without cutting directly onto Descemet’s membrane, dramatically decreasing the risk of a perforation.
Creating the Scleral Lake
It’s important to understand that the window you’ve created is the main route through which aqueous will flow out of the anterior chamber. Aqueous seems to move though the corneal tissue much more efficiently than it does through the trabecular meshwork. So, once you cross Schwalbe’s line with the Drysdale, the flow often increases dramatically.
In order to achieve reasonable flow, your dissection has to be far enough anterior into the cornea; if it isn’t, the resulting flow may not be sufficient to help lower pressure. In fact, there is emerging evidence that window size may be correlated with ultimate IOP. The amount of flow, however, will vary a bit from patient to patient. If there appears to be no flow coming through an apparently well-constructed window, that’s a cause for concern.
 Once you’ve completed your deep scleral flap, the flap has to be removed. I use either Vannas scissors or a micro-Wescott scissor for this purpose. (I recently tried a new prototype pair of scissors designed specifically for this step, which hopefully will be available for purchase soon.) This is another time during the procedure when perforations can occur. If a perforation does occur, you’ll be able to tell the approximate size by the amount of flow coming out. Microscopic perforations are typically not a problem, but a large perforation will make it difficult to complete the surgery successfully.
One reason a perforation can be a problem is that the iris usually seeks to plug any perforation, large or small. Plugging a small one won’t create an enormous problem—although if I see a significant amount of flow coming from one location, I’ll put the patient on pilocarpine postop to try to keep the iris away from it. However, if the perforation is large, the iris will typically plug it, so I will usually convert the procedure to a trabeculectomy at that point. (Note: If you have to switch to trabeculectomy, you’ll need to do a peripheral iridectomy and then close the flap so you end up with a level of flow that you’re accustomed to with a trabeculectomy. Some surgeons don’t make peripheral iridectomies for their trabeculectomies, but in this situation I believe it would be an unwise omission.)
There has been some discussion about whether using mitomycin C during canaloplasty would be helpful. I haven’t used mitomycin C, in part because I don’t want to create a bleb. Some have argued that mitomycin C in the bed of the deep flap or in the scleral lake would help to keep that open and allow flow into the cut ends of Schlemm’s canal. I can see potential downsides to using mitomycin C, so I’ve chosen not to.
Stenting the Canal
The next step is inserting the probe into Schlemm’s canal. The most important thing is getting the probe into the canal itself; it’s very easy to attempt to insert the probe too far anteriorly. If you do, you’ll create a perforation and the probe will end up in the anterior chamber. To avoid this, you can look for a landmark to identify the canal. About 70 percent of the time, you’ll see a tiny bit of blood trickling out of the cut end of the canal. If there’s no blood, you can usually see a little bit of pigment in the canal when it’s been unroofed that can help you identify the opening. Typically the ostium is slightly posterior to the pigment in the canal.
Once the probe is inserted into the canal, you may encounter obstructions as you advance the catheter; these are the septa. Usually, the probe just pops through them. I find that most of the time I encounter them at three and nine o’clock, and often one clock hour before reaching the other open end—i.e., 11 clock hours around the eye.
Occasionally, you may find that the probe gets hung up and doesn’t want to move forward smoothly. If that occurs, back the probe up a little and try again. If you still can’t get through, then pull the probe out and go into the canal in the other direction; if you were going clockwise, go counterclockwise. In almost every case you’ll be able to get through.
One can assume that rupturing the septa will have a positive impact on aqueous outflow. While intact, they effectively divide the canal into isolated segments, and it’s hard to see the advantage of sequestering outflow to smaller areas. Studies have suggested that each isolated segment within the canal only empties into its collector channel. If that’s the case, and that channel isn’t functioning well, that whole section of the trabecular meshwork is unable to help eliminate aqueous. Thus, the catheter may be improving IOP simply by allowing the flow to travel through 360 degrees of the canal so it can exit through a better-functioning collector channel.
In rare situations, you may be unable to pass the probe through the canal in spite of your best efforts. (That has happened to me about five times.) In that situation, you have to chose between two options: converting the procedure to a trabeculectomy, or simply closing the superficial flap, essentially converting it to a viscocanalostomy. I’ve done the latter, and in many cases, the result is fine. However, that’s not always the case; one woman came in the next day with a pressure of 70 mmHg, forcing me to convert her to a trabeculectomy (via needling procedure) in the office. In each situation I would decide which option makes the most sense based on the health of the optic nerve and the level of IOP I believe the patient can tolerate in the long term.
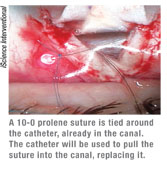
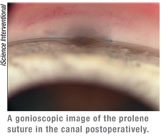
Once the probe has been gently pushed through the canal and the tip emerges, the surgeon ties a suture around its end (See image, left) and pulls it back in the other direction, ultimately leaving the suture in the canal instead of the probe. Then, the surgeon makes a slip knot with the ends of the suture, causing the suture to stent open the canal.
The one potential problem that’s important to be aware of at this stage in the procedure is that the suture can get stuck on something outside of the eye as you attempt to pull it into the canal. If you continue pulling while the suture is caught, the suture may rip through the trabecular meshwork into the eye, causing a trabeculotomy. This happened in one of my early cases; I was being careful about keeping my hand away from the suture—which is the most common way for the suture to get hung up—but the suture got caught on a dried area of the drape and stuck to it. There was minimal bleeding, but the surgery ended up not working very well as a trabeculotomy, so I used needling postoperatively to convert the procedure to a trabeculectomy. The patient ultimately did very well.
Having the proper tension on the suture is of critical importance; studies have found that the ultimate IOP result correlates with the tension. To achieve the best results it’s helpful to first lower the IOP by burping the paracentesis. Then, tie a 4-1-1 or a slip knot with the 10-0 prolene; it should be tied tighter than you might think it should be. Generally, once you’ve tied the knot you shouldn’t be able to move the stitch very much, or retract it more than 1 mm.
Once you’ve tied your knot, you sew the superficial flap down so that it’s watertight. Then close the conjunctiva, and you’re done.
Postop Management
Managing a canaloplasty patient postoperatively is more straightforward than managing a postop trabeculectomy patient. After a trabeculectomy, I’d examine the patient at least once a week for the first month; with canaloplasty, I check the patient at one week and two weeks, then typically three to four weeks after that, depending on how he’s doing.
A few issues can arise:
• Insufficient drop in pressure. If the pressure is higher than I hoped to produce, I use a gonioscopy lens to view the angle. (I recommend that new surgeons view the angle on most postoperative visits.) I hope to see a translucent window of sufficient size without iris occluding the window. If the iris is beginning to adhere to the window, I start the patient on pilocarpine 2% and maintain that for approximately four weeks. If the window looks opaque, I plan YAG laser goniopuncture.
It’s also important to remember that these patients can have steroid responsiveness early on. I try to have them off of steroids within five weeks. Often the IOP will decrease in the weeks after cessation of the steroids.
If the pressure’s high, and it looks like the canaloplasty is not functioning sufficiently after four weeks or so, you have two options: You can use laser goniopuncture to create a hole in the Descemet’s window, or use needling to convert to a trabeculectomy and create a bleb. The majority of the time the laser is sufficient.
• Suture extrusion. One concern that’s sometimes mentioned is the possibility of suture extrusion weeks or months after the surgery. This is a very rare occurrence; I personally haven’t encountered it. I had one partial suture extrusion, involving less than one quarter of the canal; however, I noticed it during the first week postop, so it probably happened during the surgery. That patient’s pressure has been excellent during the two years since the surgery.
• Bleb formation. In some cases, a bleb may form unexpectedly, indicating that the superficial flap is not watertight. Whether this should be of concern depends, to a large extent, on the timing of its appearance. It’s not uncommon to see a small bleb early on, within the first two weeks after surgery. Typically, you won’t want to do anything to maintain that bleb, and left unattended, it will disappear. However, you might make an exception if you have reason to think the canaloplasty surgery isn’t functioning normally—for example, if you weren’t able to place a suture, or you had a large perforation.
Also, you should try to preserve the bleb if you believe that the current IOP is a function of the bleb. For example, if the IOP is 14 mmHg at six weeks and the bleb has been expanding, not disappearing, you might choose to save the bleb and take steps to enhance its function (perhaps antimetabolites, laser suture lysis, prolonged steroids or needling).
Overall, Smooth Sailing
Although it may sound like there are many potential difficulties when performing canaloplasty, most of the problems I encountered were in my first 30 or 40 cases. Today, most of my canaloplasties go smoothly, with no complications. Experienced canaloplasty surgeons may some-times be unable to pass the probe, or occasionally rupture a window; but those are probably the only intra-operative problems an experienced surgeon is likely to have.
Given that reality, when do I choose canaloplasty over trabeculectomy? It depends on how low a pressure the patient needs. For me, if the patient can have a pressure of 16 to 18 and can be on some medication, then canaloplasty is a reasonable option. It’s a less-invasive procedure with fewer side effects than trabeculectomy and a faster recovery, and it’s much easier for the patient. On the other hand, if 16 to 18 mmHg is too high, or the patient can’t use any drops, or the nerve is just horrible and has really advanced damage, then a trabeculectomy would still be my first choice.
Despite the concerns described earlier, a surgeon starting canaloplasty today is unlikely to experience the same challenges that early adopters faced, even in early cases. Many surgeons have already helped to pave the way, making it easier to understand what needs to be achieved and developing new instruments that help to make the surgery easier to manage and perform. For that reason, adding canaloplasty to your armamentarium is a much smoother transition than it would have been a few years ago. If you’re a skilled surgeon and can perform and manage a trabeculectomy, you should be able to do this surgery. I’d definitely encourage you to try it.
Dr. Flowers practices at Ophthalmology Associates in Fort Worth, Texas. He received the American Academy of Ophthalmology Achievement Award in 2006.