The Procedure Explained
For surgeons who are unfamiliar with the iStent procedure, which occurs in the setting of cataract surgery, here’s a brief summary of the main implantation steps:
• Under viscoelastic, the surgeon puts the iStent inserter through the cataract wound;
• The surgeon uses a gonio prism to view the angle; and
• The inserter engages the trabecular meshwork and the iStent is advanced into Schlemm’s canal, into which it’s released and secured.
Practice Makes Perfect
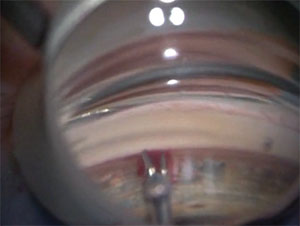
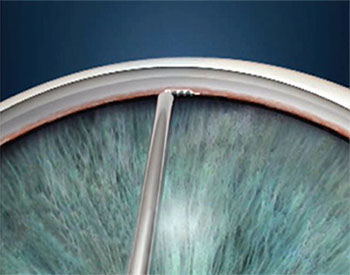 |
| After engaging the trabecular meshwork with the tip of the iStent, the surgeon flattens it out and implants it in the canal. |
Surgeons say you can do your own version of a wet lab in your OR by practicing some of the maneuvers required during iStent implantation during some of your routine cataract procedures.
“I definitely recommend that, before you start to do the iStent officially, you do some practice,” avers Steven Sarkisian Jr., MD, director of the glaucoma fellowship at the Dean McGee Eye Institute at the University of Oklahoma. “On a routine day when you’re doing a lot of surgery, actually practice turning the patient’s head 30 degrees away from you and turning the microscope as well. Also practice using the gonio prism. You can do this after you put the lens in but before you remove the viscoelastic; just put a little viscoelastic on the cornea, turn the head and use the gonio prism to visualize the trabecular meshwork. See if you can identify the meshwork, the scleral spur and the ciliary body. Become familiar with how the process feels. I wouldn’t necessarily go in with any instrumentation while you’re doing this, though some have advocated putting a Sinskey hook or similar instrument through the cataract wound to see what it feels like to have it in your dominant hand with the gonio prism in the other. However, be careful, because if the patient moves, there could be an added risk since the head isn’t taped at that moment of the surgery. If you get familiar with the necessary head position and what’s required to adequately visualize the angle and angle structures, that would mean fewer variables for you to deal with on the day you start your first iStent surgery.”
Timing the Implantation
The first decision the surgeon will be faced with is to implant the stent before or after phaco. Experts say there are pros and cons to each approach.
Nathan Radcliffe, MD, director of the glaucoma service and clinical assistant professor at New York University’s Langone Medical Center, prefers to implant the iStent after the cataract surgery has been completed. “I was trained to do it this way and have never had any problems,” he says. “The potential disadvantage of this approach is, if you have corneal edema after the cataract surgery, you may have trouble visualizing the trabecular meshwork. I have found that even with corneal edema, however, the view is usually good enough.”
Dr. Sarkisian also performs the implantation after phaco. “I don’t advocate placing it before phaco, especially when you’re learning, because when you put an iStent in a phakic eye, the angle structures look different. When the eye is slightly hypotonous after phaco, especially if the patient has a lightly pigmented trabecular meshwork, you want to see that blood reflux in the canal, which you’re not going to experience as much when the eye is phakic. Plus, if there should be any bleeding during the iStent implantation, it can distort your view when you make your capsulorhexis.”
York, Pa., ophthalmologist Denise Visco, who has been learning quickly as she’s begun implanting the iStent, offers another reason why some surgeons prefer to implant the device after their cataract surgery. “I like implanting it at the end of the procedure,” she says, “because if there are issues or problems with the iStent, I don’t want them disrupting the cataract surgery. I want to perform a perfect cataract procedure and have that completed before I attempt the iStent insertion. However, there will be more blood reflux from Schlemm’s when you implant it after the cataract surgery, which can be a hindrance in some cases.”
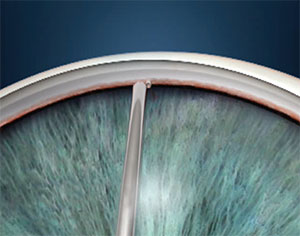 |
| Just because the tip is in doesn’t mean the job’s done; tapping the snorkel ensures that the iStent is fully implanted. Steven Sarkisian Jr., MD |
Modifying Your Technique
Since implanting the iStent introduces a new wrinkle into your cataract surgery, surgeons say minor modifications to your cataract technique can be helpful.
“While I know that most physicians will be making temporal incisions, those who currently make superior incisions have some decisions to make,” explains Dr. Radcliffe. “It’s certainly possible to place a stent in the inferior angle through the superior incision, but I don’t think it’s easy. To begin with, you’ll be dependent on torqueing the eye inferiorly, rather than simply tilting the head position as temporal surgeons can do. The Vold Gonio lens, available from Transcend Medical, and a gonio lens clip available from Glaukos may facilitate moving the globe without changing head position.
“One tip that I think is important for surgeons, wherever they make their wounds, is to be sure not to involve any limbal vessels in your wound construction if you’re planning on placing a stent,” continues Dr. Radcliffe. “Even the smallest bleeding vessels around the region of the wound can cause blood to be mixed in with the Goniosol on the surface of the eye, hampering the view and making things quite frustrating.”
Dr. Visco says a temporal wound is key for her. “I like to make my cataract wound temporally so I can come straight through the incision instead of coming at an angle,” she says. “This is because when you hold the gonio lens with one hand and you’re coming straight with the other, you don’t want to have your hand at an angle; you want your incision right in front of you. I’ll make the incision at 180 degrees or zero degrees, depending on which eye I’m operating on.
“And if you’re performing femtosecond AK incisions with your cataract surgery, wait to open the incisions until after the iStent is in place,” Dr. Visco adds. “That way, you won’t risk having issues with visualization. If you open an AK incision and the patient happens to have a little bit of epithelium that erodes off of there or has a little abrasion near the AK incision, that could potentially have a negative effect on your image with the gonio lens when you’re looking at the angle.”
Dr. Visco keeps the same topical anesthesia regimen as in her normal cataract cases. “Though iStent implantation is easier for you if you use retrobulbar, giving you more control over the eye, I didn’t want to have to say to my patients, ‘You’re getting a retrobulbar injection because you’re getting the iStent.’ However, if you’re really struggling, retrobulbar is one thing you could do to help make it easier.”
The Insertion Phase
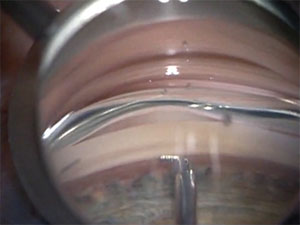 |
| Some surgeons may find it easier to manipulate the iStent inside the eye using a micrograsper forceps. |
Once the surgeon has set the stage with the proper cataract wound creation and has practiced with the gonio lens preoperatively, he’s ready to tackle the iStent implantation itself. It’s at this stage, surgeons say, that there are several tips and techniques that can add up to improved outcomes.
• Proper positioning. Getting the patient’s head, the gonio lens and the surgical microscope into perfect alignment makes the procedure a lot easier, experts say.
“Generally speaking, we tilt the patient’s head 30 degrees away from us,” says Dr. Radcliffe. “However, each physician may develop a personalized angle. If the patient has a neck problem or is unable to tilt the head, it’s possible to get the appropriate angle entirely with scope positioning. Additionally, for patients under topical anesthesia, the patient may remain in the supine position and just direct her eyes away from the surgeon. An issue in that case is that if the patient decides to move her eyes back to primary position while an instrument is in the angle, a cyclodialysis cleft could develop. The other issue is that patients aren’t always able to titrate their degree of eye movement, and it may vary from moment to moment, so this introduces some additional variability into the procedure.”
“You may have to move the head around a bit,” says Dr. Sarkisian. “Even after having done hundreds of cases of angle surgery, I will still have to move it sometimes. In some cases, I note that I’ve not turned the head enough or I’ve turned it too far. People’s heads are simply different. There’s no one fixed place it has to be. Just put it in a place where you see the best. Sometimes the patient will help you with the head positioning, and sometimes he won’t help and will instead look toward you.”
Dr. Visco says if you’re having an issue with visualization, you can also manipulate the microscope angle. “If you’ve turned the patient’s head the recommended number of degrees but are still having issues with visualization, you can turn your microscope more toward yourself,” she says. “Because if you turn the patient more, then you’ll just be reaching at an unnatural angle to try to put in the stent. To help prepare patients, I’ll instruct them in the office and in the preop area to remember to keep their eyes looking straight ahead even when I turn their head and not to shift their gaze back toward me.”
Your approach to gonioscopy will have an effect on the ease of the procedure as well, and there are even specially made stabilizers for gonio lenses to assist the iStent surgeon. “When using the gonio lens, you don’t want to press too firmly on the cornea, which can create striae and obstruct your view,” explains Dr. Sarkisian. “The kind of gonio prism you use will help when you’re starting out with the iStent. There’s a new device from B+L/Storz that can be placed onto your gonio prism to help stabilize the globe, the Berdahl Gonio Prism Stabilizer. I’ve done a trial of it and I was impressed with the way it stabilizes the globe in a way that’s more friendly to the conjunctiva than, say, a Thornton ring might be, since it’s more comfortable for the patient. It’s also a lot easier to use even if the interpalpebral fissure is very narrow; you can still stabilize the lens nicely.”
The amount of viscoelastic you use can also play a role in visualization. “Don’t over- or underinflate the anterior chamber with viscoelastic,” advises Dr. Sarkisian. “If you overinflate, you’ll tamponade the blood in Schlemm’s canal and possibly distort the angle architecture. If you underinflate, the iris will get in the way. You need to get the right level of inflation.”
• Finding the best implant site. Surgeons say there are signs you can look for in order to find the right place to implant the iStent, but add that, if you’re starting out with the device, it might be best to not get too hung up on finding the perfect spot. “Though Dr. Ike Ahmed has discussed targeting specific regions in the trabecular meshwork to enhance efficacy, my advice for most surgeons is to simply put the stent in the location where you have the greatest chance of getting it in correctly,” says Dr. Radcliffe. “For most people, this is going to be directly nasal to the temporal corneal incision, or perhaps offset by less than one clock hour. For example, if I’m doing a right eye and I have a temporal incision, then I may put the left-handed stent in at the 2 o’clock position, because the natural curvature of the eye will provide a 15-degree angle, which is ideal for stent insertion.”
If you want to hunt for the ideal spot, Dr. Sarkisian says there are landmarks to watch for. “After phaco, the patient is in a relatively hypotonous state, so you can see blood in Schlemm’s canal,” he says. “Seeing pockets of blood there clues you in on where the outflow is going to be best, and where there’s probably a collector channel. That’s really where you want to put in the iStent, and you’ll find your results significantly improved if you do that. Another tip is to look for collections of pigment in the angle because, again, what the draining action looks like will reveal where the higher levels of outflow are. It’s kind of like finding the drain in the bottom of a bathtub: Look for where the hair is collecting and that’s where the drain is. In the eye, where the pigment is collecting is likely where the outflow is the fastest.
“Sometimes,” Dr. Sarkisian adds, “if there’s a lot of bleeding at the insertion site—especially early on in your experience with the stent when the procedure might take longer—you may need to take your I/A, remove the viscoelastic, and then place more of it. This is because, though more viscoelastic can help clear some blood, in some cases you’ll get a blood clot in the angle. Taking out the viscoelastic and putting more in can clear the clot and restore your view.”
• Maneuvering tips. Like many implantation techniques, placing an iStent involves some finesse as well as technical skill, say surgeons. “When you’re placing the iStent in the trabecular meshwork, make sure you don’t take too steep of an angle of approach,” warns Dr. Sarkisian. “For beginning iStent surgeons, the training instructs them to go at a 15-degree angle into the meshwork and then flatten out. But I think whatever angle you need to pierce the trabecular meshwork is fine. However, as you place the iStent, remember that the eye is curved. You almost want the feel of using a fine paintbrush as you implant it, like painting eyelashes on the Mona Lisa. You go in, then kind of come toward yourself a little as you’re implanting it so you don’t hit the back wall of the canal. If you hit the back wall, the entire eye will move in the direction of your motion and you won’t be able to implant it. You have to have a light touch. Once the iStent is in, tap the heel to make sure it’s set firmly. Think about it like putting on a shoe. For a lot of surgeons, when they first implant the iStent, it’s easy for them to get their toe in the shoe—to get the tip of the iStent implanted—but unless the heel of the stent is also planted firmly in, it’s not going to work effectively. Just piercing the wall of the trabecular meshwork doesn’t mean it’s going to be effective. If you implant the iStent and find the heel is in somewhat but not in completely, I suggest re-grabbing the snorkel and pushing it in just a little bit more so that it’s set firmly. Also, don’t use a Healon cannula to tap it in. Use the inserter. This is because the lumen of the cannula is bigger than the snorkel of the iStent, so you can inadvertently explant the iStent with a Healon cannula.”
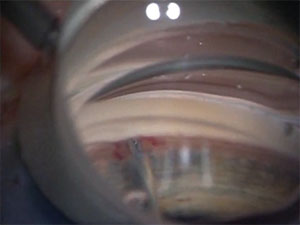 |
| When the iStent pierces the trabecular meshwork, the resulting blood can sometimes make visualization challenging. Denise Visco, MD |
• Consider using forceps. Dr. Visco says it may be easier for some surgeons to eschew the iStent inserter for the actual implantation and instead use a micrograsper forceps. “I’ll release the iStent from the iStent inserter in the area of the angle, remove the inserter, and then go back in with a micrograsper,” she says. “I’ll use the forceps to pick up the iStent and then insert it. I find this gives me more control over the iStent, because I can open and close the forceps as needed. Specifically, it’s easier to engage Schlemm’s at the 15-degree angle and then flatten it and thread it into the canal with the forceps, because you can tap it down flat, and then re-grab it immediately and continue to advance it. (See image, p.42) There’s less manipulation and wrist movement necessary than with the injector. With the inserter, once you hit that 15-degree angle, you have to rotate your wrist in a way that doesn’t necessarily come easily or feel natural. And, if you put too much pressure on the stent before you release it, you cause a problem in which the stent is ejected that messes up the insertion. With the forceps, you can easily change the angle of approach by continually releasing and re-grasping the iStent. Also, with the inserter, you have to make large moves with your wrist to make small adjustments inside the eye which can cause corneal distortions at the entry wound that can interfere with your view. With the forceps, you don’t have to move your hand as much to maneuver the iStent in the eye.”
Adverse Event Management
In the Food and Drug Administration trial of the iStent, Glaukos reported the most common adverse events were early postoperative corneal edema (8 percent); loss of a line of best-corrected vision at or after three months postop (7 percent); posterior capsular opacification (6 percent); stent obstruction (4 percent); early postoperative anterior chamber cells (3 percent); and early postoperative corneal abrasion (3 percent). Surgeons say their experience with the device has taught them some things about managing adverse events, as well.
“Corneal abrasions or erosions can occur with the lightest touch,” says Dr. Visco. “Certain patients with anterior basement membrane dystrophy or even just dry eye can have these issues. I had one patient with very dry eyes who, by the time we got to the OR, had such a dry eye from the preop dilation drops that I had difficulty seeing when performing her cataract surgery. I didn’t even attempt the iStent because she had such a keratopathy from just the dilation drops.”
 |
| Some surgeons say using forceps allows them to release and re-grasp the stent without large, unnatural wrist movements. Denise Visco, MD |
Dr. Sarkisian says to watch your postop medication regimen. “Frankly, the number-one complication with the iStent is the use of too strong a steroid or too high a steroid dosage postop,” he avers. “You can get a steroid response from either of these factors. The party line is not to change your postop phaco medication regimen, which is fair, since you don’t want to overhaul your normal postop management. However, I personally use loteprednol, a milder steroid, afterward rather than prednisolone acetate, due to the many steroid responses I’ve seen. Also, you won’t know what the patient’s final IOP will be for two to three months. So, if the patient isn’t quite at your target IOP right away, be patient. Remember that even low-dose loteprednol can have a steroid response."
“The other postop complication,” Dr. Sarkisian adds, “is, in rare cases, if patients aren’t compliant at all with their steroids, or if the angle was slightly narrow before surgery, you can have peripheral anterior synechiae focally of the iris to the iStent. Interestingly, using very low energy, you can YAG the tip of the iStent and get rid of the PAS. I’ve only seen that twice in hundreds of iStent cases, however.” Surgeons say there can be transient hyphema in a few patients postop, as well.
Dr. Sarkisian says if things aren’t spectacular from the outset, stick with it. “Surgeons who start using the iStent may be discouraged in their first couple of cases if they don’t feel that it went very well or it wasn’t as effective as they’d hoped,” he says. “You have to stick with it, because once you get comfortable implanting the iStent—and that takes between five and 20 cases depending on the surgeon—you’ll get better at predicting where to implant the device so it will be more effective.” REVIEW
Drs. Sarkisian and Radcliffe are consultants for Glaukos. Dr. Visco has no financial interest in the products discussed.