 |
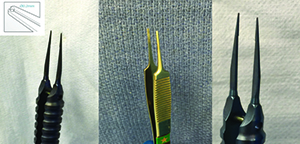
| When handling the conjunctiva it’s important to avoid using forceps with teeth. Three safe options are (left to right) Hoskins forceps; Lim conjunctival forceps; and tying forceps. |
Surgical Exposure
Good exposure of the surgical area is crucial for success. If you don’t take the time to get good exposure, the rest of the case becomes difficult because it’s hard to see, and hard to gain access with your instruments.
Two key exposure-related factors will affect your surgery:
• Choice of eyelid speculum. The eyelid speculum you choose will make a big difference in the amount of exposure you can achieve. Most cataract surgeons use a standard wire speculum; that’s fine for cataract surgery because you don’t need a great deal of exposure for that type of surgery. However, in glaucoma surgery you may be working 8 to 9 mm posterior to the limbus. My eyelid speculum of choice is the Lieberman lid speculum, which is adjustable and can be widened to achieve the access you want.
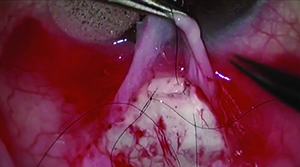
• The traction suture. This is placed into the cornea to provide leverage to pull the eye downward so that we can access the superior part of the globe, which is the area of interest when placing glaucoma drainage devices or in limbus-based trabeculectomies. I use a double-armed 7-0 vicryl suture for the traction suture; I pass the needle through the cornea superiorly.
The key caveat when placing a traction suture is to make sure that you stay in the corneal stroma and avoid passing the needle too deep, which can lead to penetration of Descemet’s membrane, creating an opening into the anterior chamber. It’s not always easy to avoid this. Sometimes you can see that you’ve punctured Descemet’s or you can feel a little pop, but you can’t always see it or feel it. I always take a Weck-Cel sponge and dab the entry and exit point of my traction suture to see if aqueous is leaking.
If you realize that you’ve punctured Descemet’s, you can take the traction suture out and place it somewhere else. But if you don’t recognize it, the globe will soften and the anterior chamber will shallow as you proceed with the surgery. If that happens, you’ll need to remove the traction suture, and you may need to make a paracentesis incision to reform the anterior chamber.
Block With Caution
Although topical anesthesia can be used in many surgical situations, anesthesia can also be achieved via a retrobulbar block. However, if you do choose to go with a block, be careful when deciding what volume you’ll inject into the orbit. When I was a resident doing cataract surgery, I would usually inject 5 or 6 ccs of anesthetic. What I didn’t initially realize was that different people have different-size orbits; Asians, for example, may have smaller orbits than Caucasians. One of my patients who received anesthetic retrobulbar block had a very long, proptotic, myopic eye; at the end of the case we couldn’t close his eyelids. We ended up having to do a lateral canthotomy.
Today, I look carefully at each patient’s anatomy and titrate the block accordingly. If the patient has a small or shallow orbit or tight eyelids, I minimize the amount of block I push.
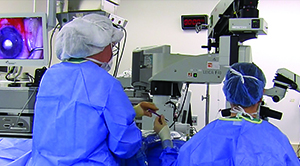 |
| When holding conjunctiva or other tissue during surgery, keep looking into the microscope when you’re passing off or receiving instruments from your scrub tech. Looking at the technician or your hand can cause your body to shift, potentially tearing the tissue you’re holding. |
Respect the Conjunctiva
Respecting the conjunctiva means handling it very gently. As a glaucoma surgeon, you should avoid handling the conjunctiva using forceps that have teeth. 0.12 forceps are commonly used for many purposes in ophthalmology, but they have sharp teeth at the end for grabbing; you can punch a hole in the conjunctiva if you use forceps like that, and doing so will pretty much ruin your surgery.
The picture on the facing page shows three types of non-toothed forceps that can safely handle conjunctiva. Hoskins forceps have a very fine tip with a little notch at the end that helps you grab tissue without poking a hole in it. Another option is a pair of conjunctival forceps I designed during my fellowship, called the Lim conjunctival forceps. They have a thicker tip with a crisscross pattern that helps you grip suture or conjunctiva without making a hole. The third option is tying forceps, which you might find in any tray of surgical instruments. They have very tapered, thin ends, with no teeth or pattern. In general, the main concern is to avoid toothed forceps.
One other point: When you’re using forceps to move tissue around, or holding the conjunctiva for exposure, don’t jerk on the tissue or pull it too hard; you can tear it or buttonhole it.
Handoff at the Microscope
When you’re passing off instruments or a suture to the scrub tech, don’t turn away from the microscope to look at the scrub tech. Turning to look is the natural impulse, but you want to keep your eyes on the surgical field through the microscope. In a normal social situation, this would be rude, but in the OR it’s expected; it’s something all very efficient surgeons do. The scrub tech will take the instrument out of your hand. (See picture, above.) When you ask for the next tool—and in many cases a good tech will already know what you need—he or she will place the tool in your hand without you having to look up.
There are two good reasons for doing it this way. First, it’s more efficient and fluid to not look away; you’re not wasting time looking and stopping and looking and stopping. Second, it’s a safety issue. When you need to hand off or receive a tool, your other hand may be holding the conjunctiva or the trabeculectomy flap or some part of the eye that’s delicate. If you look away from the scope, your body will tend to shift with you, and you could inadvertently tear the tissue as your body moves.
A good analogy is bicycling down a road. If you’re looking straight in front of you, the bike travels straight down the road. But if something on the side of the road catches your interest and you look at it, your bike will veer off-course.
Fortunately, like athletes, surgeons are usually well-aware of the location of their bodies in space, and where things are in relation to them. Achieving a smooth handoff is a goal all surgeons should strive for.
Incisions: Fornix vs. Limbus
When performing trabeculectomy surgery, the surgeon must decide whether to use a fornix- or limbus-based incision. It’s important for people doing glaucoma surgery to consider the differences between these options, because each has pros and cons.
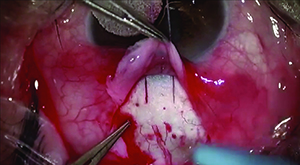 | 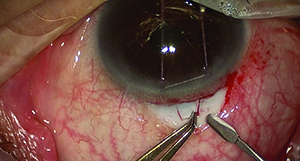 | |
| Limbus-based flaps (left) and fornix-based flaps (right) have different advantages and drawbacks. Limbus-based flaps require more dissection and help from an assitant but minimize the chance of postoperative leakage and are more comfortable for the patient. Fornix-based flaps are faster and easier to make, but are less comfortable for the patient and more prone to leakage. | ||
The converse of that is the limbus-based conjunctival incision, in which you make the incision 8 or 9 mm back in the fornix. Here, you make the cut in the conjunctiva and dissect forward toward the limbus. It’s called a limbus-based conjunctival incision because the base of the flap is at the limbus. (See examples, above.)
The benefits of using a fornix-based incision are that you have better exposure at the limbus to dissect your scleral flap, so it’s a faster dissection of the conjunctiva and you don’t need a lot of assistance. The cons include that it’s harder to close this type of incision because you’re right at the limbus. If the conjunctiva is fragile, you have to be careful; if you punch a hole in it, it will leak. And even if you do get good closure, sometimes you’ll get a leak at the closure site postoperatively.
The benefits gained with a limbus-based incision include the absence of any problem with leakage post-operatively, unless you buttonhole the tissue, because the closure is way back in the fornix away from where the eye is exposed. There’s more comfort for the patient because you don’t have sutures right at the limbus where the patient can feel them. The downside of a limbus-based incision is that it requires a little more dissection of the conjunctiva for good exposure, and it requires you to have an assistant to hold the conjunctiva out of the way while you dissect the scleral flap for the trabeculectomy. You have to weigh the benefits and the drawbacks when deciding which approach to use. (After placing the lid speculum, a quick check of the exposure with calipers can help guide the decision for the type of incision. If the exposure is less than 8 to 9 mm, the choice is limited to a fornix-based flap, with the incision at the limbus.)
Suture Knot Technique
Two techniques can help you avoid problems when making knots in your suture.
 |
| After pulling the needle through the tissue, set it down away from the field, pulling the suture straight. This prevents suture tangling (see above) which makes tying a knot more difficult. |
Throwing the needle off the field means that once you pull the needle through, you set it down away from the field, pulling the suture straight. Then, when you make your next move, the suture goes the way you want it to go; it doesn’t tangle up on itself. This is a very simple concept, but it works. (You can see a video illustrating this technique at https://www.youtube.com/watch?v=b91iKGnm9og.)
Second, learn to make a slipknot. When you tie a monofilament suture like 10-0 nylon into a slipknot, it doesn’t lock down immediately. This is an advantage when performing trabeculectomy. You make a flap and a little incision into the anterior chamber to allow aqueous to come out; then you close the flap with a suture. But you don’t want to tie the flap down very tight, because you’ll get no flow. With a slipknot, you can adjust the tension of the suture on the flap until you get the flow you want. Then you can finish tying the knot and make it permanent. (You can see a video of this technique on YouTube at https://www.youtube.com/watch?v=bMzXAPOCg98.)
Consider Injecting MMC
Mitomycin-C is commonly used during trabeculectomy surgery because of its ability to reduce scarring, which can undo the beneficial effects of the surgery by blocking the new outflow path the surgery has created. The traditional way of delivering mitomycin-C is by sponge, but at our practice we now deliver MMC by injection. Although this method is still not widely used, our surgical results have been just as good as when applying MMC in the traditional way, and this approach has some significant advantages over the Weck-Cel sponge method.
The first advantage is time; sponges soaked with MMC must be allowed to sit on the eye for several minutes. Injecting MMC takes about 30 seconds, which is a significant amount of time-savings during surgery. Second, there’s no danger of losing sponges or having sponge material retained in the eye, which has been reported in the literature. Third, you know exactly what dose of MMC you’re delivering because you know the volume and concentration you’ve injected. Fourth, the MMC can be spread as diffusely as you wish, helping to create a low-profile, diffuse bleb.
For more about this technique, see Mitomycin-C: The Injection Alternative in the October 2014 issue of Review. You can also watch a video of this technique on YouTube at: https://www.youtube.com/watch?v=LxmHd136FOs.
Practice Makes Perfect
Especially for beginning surgeons, practicing techniques outside of the OR is crucial. But for practice to be most helpful, it’s important to create conditions that are very similar to those you’ll encounter during real surgery.
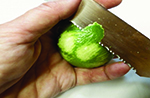 | 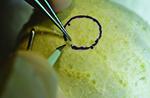 | 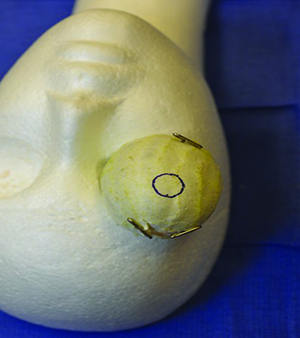 |
| Practicing surgery on animal or cadaver eyes may not duplicate the feel of surgery on live human sclera. The white rind of a lime is closer to the correct texture, making it ideal for this purpose. After the green skin is removed, a circle marks the “cornea” for reference during practice. | ||
For example, to practice scleral surgery, you can use what I call the “Lim lime” technique. The white rind of a lime has a texture very close to that of a human sclera. To practice your surgical technique, find a lime that has a good thick rind on it; peel off the green skin, leaving as much white rind underneath it as possible. Then tack the lime down so it can’t move. (We place the lime into the eye sockets of the foam heads in our resident practice lab.) If you have an operating microscope to use, that’s great; otherwise you can use a pair of loupes.
Once you’re set up, you can practice cutting trabeculectomy flaps in the lime. We take a marker pen and draw a circle the size of a cornea; residents cut their trabeculectomy flap using the marked circle as their starting point. They use practice surgical instruments just as they would in the OR, and they can practice their moves over and over. (Needless to say, the practice area smells much better when practicing on a lime than when practicing on pig or sheep eyes. And when the session is over, you have the option of using the lime to make a margarita.)
The other thing we do as part of the whole foods practice approach is to use raw chicken parts that have their skin still on. We make incisions in the chicken skin that mimic the patterns of conjunctival incisions we make during glaucoma surgery. We use bigger suture material with the chickens, just because we’re working on a more macroscopic scale.
It’s All in the Details
All of the suggestions in this article are very small, easy, practical things that can be employed right away to make your next case a smooth one. As the great John Wooden, legendary basketball coach of the UCLA Bruins, said, “It’s the little details that are vital. Little things make big things happen.” REVIEW
Dr. Lim is professor of ophthalmology and vice chair and medical director of the UC Davis Health System Eye Center in Sacramento.