The femtosecond laser offers many possibilities for improving cataract surgery. However, as with any new technology, there is a learning curve. Last year, our center became the first in our state to purchase the LenSx laser for cataract surgery, and we now perform most of our cases with it. In this article, we’d like to share the pearls that we’ve developed after working with the device now that we have a year’s worth of cases under our belt.
Preoperative Planning
As with conventional surgery, where you end up depends a lot on where you begin.
• Determine the astigmatism treatment plan. Femtosecond laser astigmatic keratotomy has shown more precision in astigmatic correction than manual limbal relaxing incisions and, as a result, it’s more important to make sure that surgically induced astigmatism is properly taken into account. We use the LRI calculator and input the corneal cylinder (composed of a summarized vector from measurements made with IOLMaster, Atlas and Pentacam) and the surgically induced cylinder, and arrive at the LAK treatment plan which we put into the LenSx. In cases where a secondary incision is located in the same meridian as one of the LAK cuts, we either rotate the secondary incision to another position or convert a two-cut LAK into a one-cut by lengthening its arcuate length, as long as the astigmatic treatment isn’t very high.
• Capsulotomy and lens fragmentation pattern planning. Though the laser produces more consistent capsulotomy sizes and locations than a manual technique, laser capsulotomy presents some new challenges: more difficulty in capsulotomy edge visualization; the occasional incomplete capsulotomy cut and the risk of tags or radial extension.
As surgeons trained in performing manual capsulorhexes, we’re used to a good light reflex and clear visualization of capsulotomy edges. Such clear visualization may no longer be there with a laser, due to multi-intralenticular cuts/planes and the occasional stirred up cortical material.
We make our capsulotomy diameter at least 5.25 mm in order to achieve the optimal width of overlap with most of the intraocular lenses that we use (with the exception of Crystalens, for which we keep the size of capsulotomy at 4.8 mm). We intentionally keep the diameter of the cylindrical lens cut small at 3 mm, in order to avoid it being too close to the capsulotomy edge, which could interfere with visualization of the edge and increase the risk of inappropriate pulling of tags and creating a radial extension.
|
With the current generation of femtosecond lasers built for cataract surgery, in spite of the optimal laser setting, tags on the edge of the capsulotomy are still present in about half of the cases. We will discuss methods to manage these tags in the section below dealing with manual maneuvers.
LenSx Operation
Once the preparations have been made, we proceed with the LenSx procedure. Here are tips for helping it go smoothly.
• Docking. LenSx docking is a more difficult process than docking the Intralase. This is because there are actually two separate mechanical tasks that need to be accomplished in docking: immobilization of the globe and contact lens applanation to the cornea. With Intralase for LASIK, a suction ring is used to achieve the immobilization, while an applanation cylinder then goes inside of that ring to achieve the second task, applanation of the cornea. With LenSx, however, a single docking device has to simultaneously achieve these two different and independent mechanical tasks, making docking somewhat more challenging. While the LenSx cone is being docked, the globe underneath it can torque (since there is nothing to fixate it apart from the docking device) and the docking can fail. To combat this, we have found the following techniques useful:
Having the cone sitting on top of the edge of the eyelid is one of the more common causes of docking failure with the LenSx device. To help avoid this, ask the patient to put his chin down. This is a change from holding it up as our patients are asked to do in other eye surgeries. As the laser operator, it’s usually easy to see if the cone hits the edge of the upper lid, but it’s more difficult to tell when it hits the edge of the lower lid. Holding the chin down helps with this. Next, gently proptose the globe forward by pushing down on the lid speculum. This is a maneuver we picked up from Houston surgeon Steve Slade.
Finally, since the applanation pressure is low and the patient can still see for most of the docking process, ask the patient to keep looking at the center of the apparatus’ white circle. You can also visualize the shadow of the pupil long before contact, to help continue to guide the patient’s gaze. The process of a good docking can be monitored by looking at the right side of the screen where one can see the cornea rise up in height. Ideally, the cornea should be horizontally flat with a minimal amount of curve. Also, when docking approaches the point at which one needs to engage suction, the distance between corneal epithelium and the top edge of the screen should be uniformly reduced.
• The primary and secondary incisions. The laser tends to cut a bit more centrally than expected. Because of this, we let the outer edge of the incision override the limbus line rather than fit inside of it whenever possible. We’ve learned that if the incision is too far inside the limbus, not only will it create more regular and irregular astigmatism, the angle of incision may end up being too vertical to the corneal plane, resulting in difficulty with the wound self-sealing.
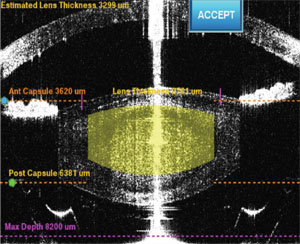
• Vertical height of the anterior and posterior lens cut. We leave about 500 µm (or more) in the thickness of the anterior uncut layer to minimize the number of gas bubbles that escape from the lens into the anterior chamber during the process of capsulotomy. These bubbles can block subsequent laser shots and result in an incomplete capsulotomy cut. For the posterior lamellar cut, we also leave at least 500 µm in order to reduce the risk of perforating the posterior capsule. Due to the order in which we cut the lens, the gas bubbles are chased posteriorly and aggregate behind the lens and in front of the posterior capsule. It’s important to keep in mind that total gas volume is proportional to the total number of lens cuts, and too large of a volume of gas accumulation behind the lens can not only obscure the visualization of the anterior capsular edge and increase the difficulty in completing the capsulotomy, it can also, in rare cases, blow open the posterior capsule, as has been reported by others.
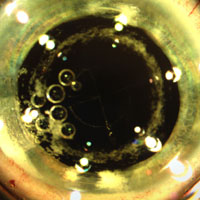
• Gas bubbles in the anterior chamber during capsulotomy. Sometimes, despite perfect docking, the initial laser pulses intended for the capsulotomy end up in the anterior chamber rather than on the anterior capsule, creating bubbles in the chamber. If this occurs in the beginning of capsulotomy, one should immediately stop the machine, re-dock and start again.
If the vacuum is broken at any point after the initial few seconds of the capsulotomy process, one should never re-attempt the capsulotomy, since the cut won’t be in the same place as the initial attempt and there’s a risk of multiple cut circles in the anterior lens capsule that will increase the risk of capsular break in the lens extraction stage. If the vacuum breaks during capsulotomy, there are two options: abort the LenSx portion altogether or restart the laser but bypass the capsulotomy program.
|
After the LenSx portion of the surgery, the patient can walk to the OR without a problem as long as the next part of the surgery begins immediately (within five minutes). A longer break will result in pupillary constriction and iris floppiness due to the liberation of lens material in the anterior chamber and the inflammatory reaction that this causes.
The Manual Aspects of Surgery
Though the size and location of the capsulotomy are much more predictable and consistent than with a manual technique, the completion of a laser capsulotomy is in fact more difficult than a manual one, because the visualization of the capsulotomy edge is poorer due to the visual interference from cut lens planes, stirred up cortex and the gas bubbles behind the lens.
We experimented with various techniques of detaching and lifting the capsulotomy circle from the edge and found that the Sinskey hook is best. The goal of this step is to indent the capsule centrally, to create a radial line, gently detach the capsule circle from its circumference and then drag the capsule centrally, under Viscoat, without disturbing too much cortex material. Instead of a Sinskey hook, one can use a cannula filled with Viscoat in a technique described by Houston’s Dr. Slade.
In terms of where to start the centralization of the capsulotomy, starting proximally is the best approach. This is because cortex is stirred up as we go along, and the proximal edge of capsulotomy is the most easily obscured and the hardest area to reach with forceps if it becomes necessary to do so later. If pulling in centrally on the capsulotomy cap doesn’t work (as in the event of a sizable uncut tag), we then use Utrata forceps to perform a concentric tear. As such, it’s critically important to make sure the track of manual tear stays as close to the laser track as possible. In cases where the laser-uncut area is too long, direct indentation using a Sinskey hook has an increased chance of causing a radial tear. In these instances, we’ll use forceps to perform a lift and peel.
After hydrodissection, an in-the-bag technique such as that used by Dr. Slade involves the aspiration of the central cylinder core of the lens with the phaco needle, followed by chopping the lens into quadrants using the phaco tip and a chopper. For this part of the procedure, we’ve developed a phaco-free technique that involves first floating the lens into the anterior chamber after the lens has been pre-chopped by the laser (the whole lens is still in one piece as it is enveloped inside an eggshell of epinucleus) and then mechanically cracking the laser-prechopped lens into small pieces and vacuuming the pieces out using a high vacuum setting and a large-bore phaco tip, without the use of any phaco energy.
It’s evident that femtosecond lasers such as the LenSx offer amazing new capabilities, including more consistent capsulotomies, reduced phaco energy (or in the case of our phaco-free technique, no energy at all) and hence less corneal edema and less risk of breaking the capsular bag. They also create excellent overlap of the capsulotomy with the edge of the IOL for a more predictable effective lens position and final refractive outcome.
Doing femtosecond cataract surgery is similar to working with the first- or second-generation phaco machines, and though the early versions of the phaco technology presented challenges, the later versions were much improved. Similarly, we feel that we are just at the tip of iceberg of this technology’s potential. To us, femtosecond cataract surgery is the digital upgrade from manual—analog—surgery, and it will prove superior to its predecessor in every respect. The future of femtosecond cataract surgery is limited only by our imagination. REVIEW
Dr. George is a corneal specialist in practice in Nashville and a former cornea fellow of Wang Vision at the University of Tennessee. Dr. Wang is a clinical associate professor of ophthalmology at the University of Tennessee, director of Wang Vision Cataract & LASIK Center in Nashville and international president of Shanghai Aier Eye Hospital. He can be reached at
drwang@wangvisioninstitute.com.