Whether you're just embarking on your journey into the world of refractive surgery or have been plying its waters for a while, an extra tip or surgical pearl is always useful. To that end, here are a few LASIK techniques that serve me well, and can probably help you optimize your outcomes, too.
The Preop Encounter
If the patient's history makes him eligible to be a candidate, we'll proceed to check the prescription, do a manifest refraction, rule out amblyopia, check the intraocular pressure and perform a routine dry-eye test. We also ask patients if they have dry eyes with or without wearing contact lenses. To me, any dry eye, especially without contact lens wear, is a red flag. If they affirm that they have dry eye, we pursue it further, instilling fluorescein to check for staining and performing a Zone Quick test (Oasis, Glendora, Calif.), which is a little quicker than a Schirmer's test, taking five seconds to tell me whether a patient is at risk for dry eye. If the patient has mild dry eye that can be managed with drops, we inform him that he's at risk for more severe dry eye post-LASIK, but we'll proceed with the procedure with his consent. I won't operate on someone who has severe dry eye, however.
Finally, we rule out keratoconus or any other corneal-thinning conditions. If someone has suspicious inferior steepening, I won't hesitate to switch him or her to surface ablation. About 30 percent of my cases are surface ablation, and I have a low threshold for switching someone to that modality.
If we find something on exam that's different from average, such as large pupils, a thinner-than-average cornea or irregular astigmatism, we inform the patient of the additional risk that he has and have him write in his own handwriting the specific risks that he has beyond those of the average patient.
Surgical Tips
I perform LASIK using IntraLase created flaps, because I feel I get the most consistent results with the laser. However, there are steps you can take to make IntraLase procedures even better:
• Centration. This can occasionally be a tricky aspect of IntraLase flaps. To make it easier to achieve good centration, I first apply the suction ring and decenter it slightly superiorly and nasally. Then, I start to bring down the docking cone. The cone projects a ring of light onto the cornea, and I try to keep the light ring centered as the cone descends. When the cone touches the suction ring, if I feel asymmetric pressure on any side of the ring, that's a sign that I'm decentered—even if it looks good on the computer monitor. You should feel equal pressure around the ring as the cone's coming down and you shouldn't have to tug and fight with it. Typically, I don't use the clip that comes with the suction ring, which means that the ring is closed until I open it at the last minute and drop the cone onto the cornea.
Another technique that helps with centration is to ink the tip of a Sinskey hook and use it to mark the center of the pupil, because once you dock the cone the pupil location isn't reliable anymore. After docking, I then use the ink mark as the center point. However, don't use too much ink because it can interfere with the application of the laser pulses, and it can make lifting the flap difficult.
• Opaque bubble layer. We see this occasionally, especially if I turn off the "corneal pocket creation" function of the IntraLase, which is designed to allow the bubbles to escape during ablation. This deactivation may be necessary if I know the flap is going to be small, such as when I'm not well-centered and have to move the location of the flap.
When you turn off the pocket, however, you have a higher risk for an OBL. When that occurs, it makes both intraoperative pachymetry and eye tracking more difficult. To help lessen these problems, I usually take a spatula and rub the stroma with it after I lift the flap, which can dissipate some of the bubbles.
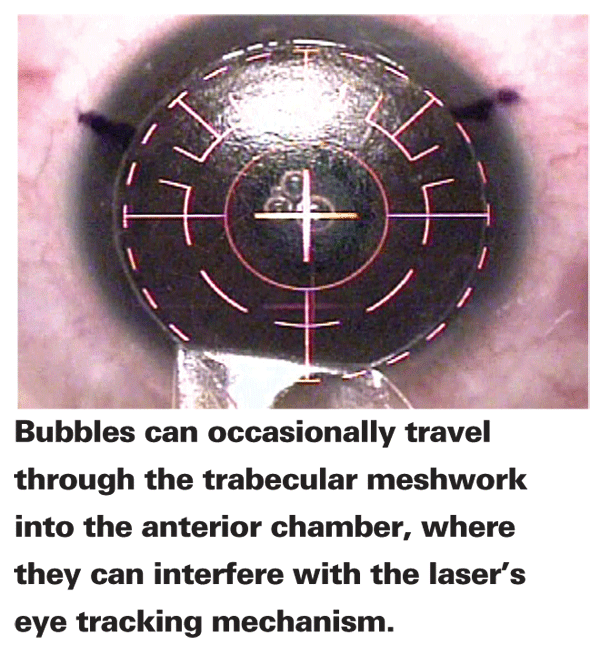
On occasion, we have bubbles that make their way into the anterior chamber. I've found that these tend to travel through the trabecular meshwork into the chamber, because they sometimes appear at 6 o'clock in the anterior chamber when the laser's at 12 o'clock. 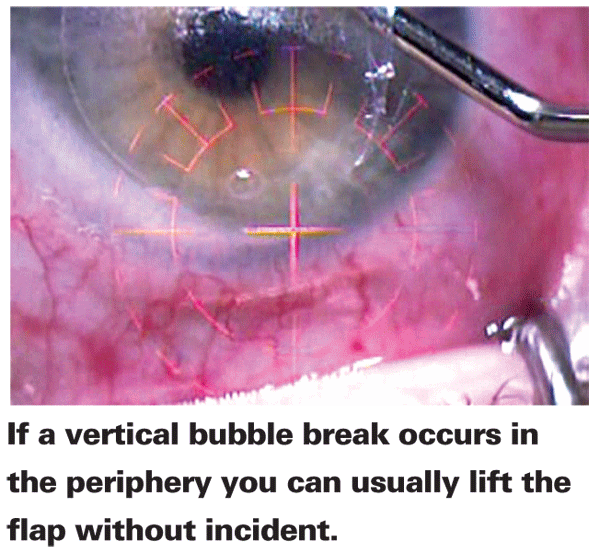
These bubbles can sometimes interfere with your tracking mechanism. They'll clear in a couple of hours, but I haven't found it necessary to stop the procedure because of them, and I'll proceed without the tracker in some cases, if necessary. Most of the time, however, the tracker will work fine. If the bubbles interfere with tracking, you can vary the lighting, which will change the pupil size and possibly allow the tracker to lock on again.
• Inflammation. This was an issue early on with our use of the IntraLase, and came from one of three possible sources: the energy level; the ink we used to mark the cornea or the Betadine scrub. First, we eliminated the Betadine. Next, we've made sure to place the ink marks on the opposite side from where we enter the flap and then wash off the excess ink. And, we now vary the laser settings so they're not as high as they used to be.
• Vertical bubble break. This is when you see a little blister in the flap as the femtosecond is creating it. I used to think these blisters were above Bowman's layer, but, when they've occurred in the periphery and I've lifted the flap, even though the flap's thin in that area I've found that the blister is actually below Bowman's. Still, you have to be cautious if one occurs in the visual axis. However, if the break is in the periphery, I'll go ahead and lift the flap. If it occurs in the visual axis, I won't lift it. Instead, I'll come back another time and perform surface ablation.
• Suction loss. If you lose suction with the IntraLase when the cut is outside the visual axis, you can reapply it using a different suction ring but with the same cone. You can then continue your cut and have a nice outcome. If you lose suction when you're in the middle of the visual axis, however, the safest course is to stop there and come back later to do a surface procedure.
If you lose suction after you've made the flap separation but not the side cut, use the same procedure described above to reapply suction but be sure to mark the edge of the flap with a marking pen before the bubbles dissipate. Without a mark, you won't know where to place the side cut since the bubbles, which can be useful as a reference point, will be gone. And, when you make this side cut, be sure to put it 0.5 mm inside the flap, to ensure you're not cutting outside of the flap.
• Interface debris. We noticed that there is more debris under the flap with the IntraLase than with the microkeratome. It turns out that, with the keratome, you flood the cornea with proparacaine as you make the pass, which washes away all the debris. So now, with the IntraLase, after we make the ink mark and before we lift the flap, we do a thorough rinse with BSS that washes the excess ink and meibomian gland secretions off of the surface of the eye. We use a good 5 mL of BSS for this. This washing has made a big difference in the occurrence of debris beneath the flap.
If you can use some of these techniques, either preoperatively or intraoperatively, I'm sure both you and your patients will enjoy better outcomes from your LASIKs.
Dr. Melki is an attending physician on the cornea service at the Massachusetts Eye and Ear Infirmary,