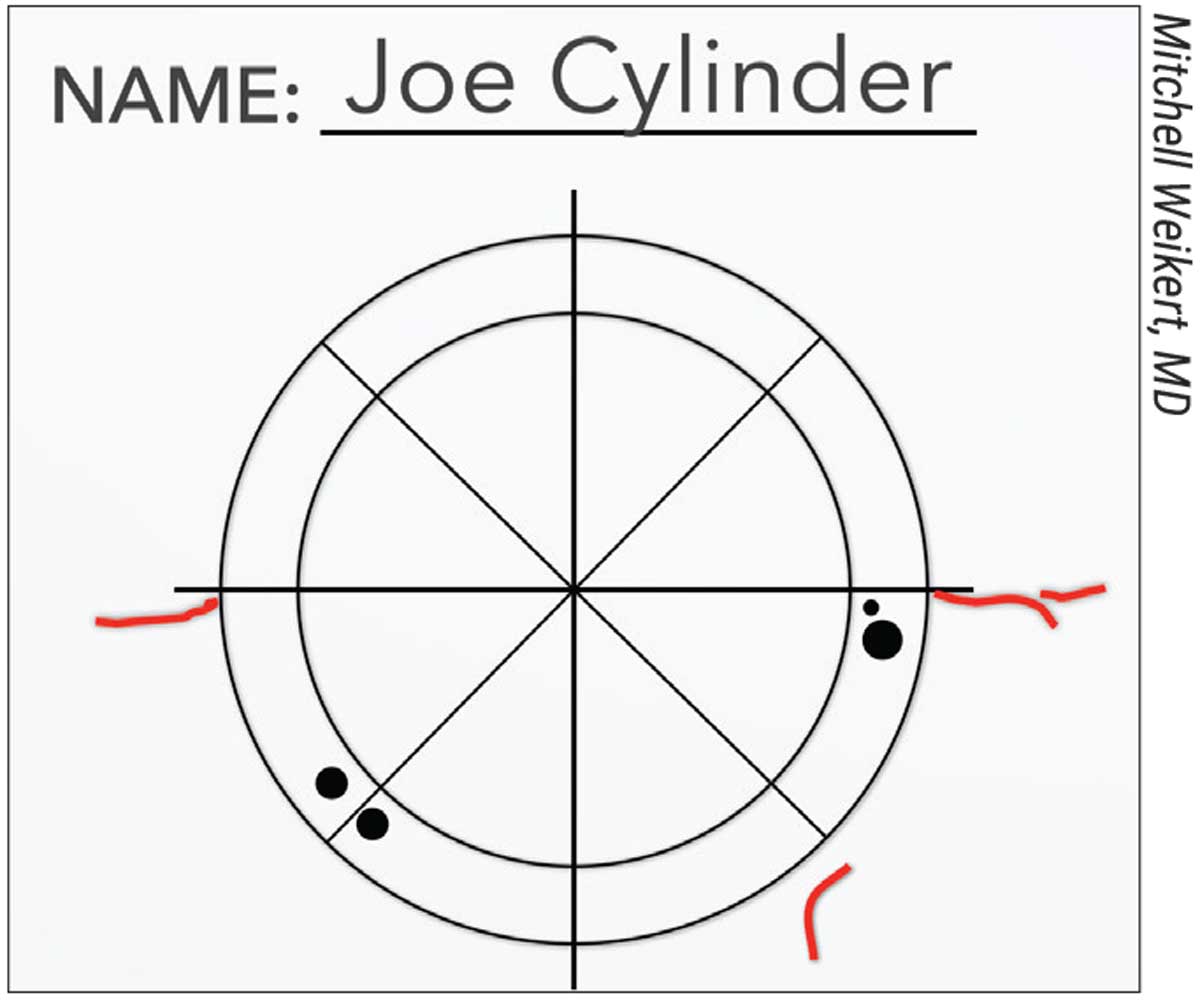
 Figure 1. A surgeon’s sketch of ocular surface landmarks for reference in the OR. |
Experienced surgeons say that you can achieve accurate toric alignment with both manual and digital tools. “You don’t necessarily have to spend thousands of dollars on a digital alignment tool,” says Mitchell Weikert, MD, a professor of ophthalmology at the Cullen Eye Institute, Baylor College of Medicine. “If you simply can’t afford it, you can still do a pretty good job with manual marking if you’re meticulous.”
Here, experts share their approaches to toric marking and offer pearls for when your measurements disagree.
Good Technique
“Studies have shown that we can be accurate within an average of four degrees with manual marking,” notes Dr. Weikert, who uses a marking pen and preoperative sketch of the eye’s landmarks (Figures 1 and 2). “Keep in mind that the higher the toricity and IOL power, the more significant small misalignments can be in your final postop results. Misalignments of five or 10 degrees can be pretty significant.”
“This is why an accurate marking technique is critical,” says Joseph Ma, MD, FRCSC, an associate professor at the University of Toronto. He describes five components of an accurate marking technique:
1. Minimize the number of steps. “You have the opportunity to introduce an error at each step, and it’ll add up,” he says.
2. Center your markings on the visual axis, not the cornea. “This isn’t necessarily the center of the image or where the topographer thinks it is either,” he adds. “Centering on the visual axis helps with central lens placement, which is key for diffractive toric lenses and planned bioptics. I like to approximate the visual axis as the corneal reflex of a patient fixation light that’s coaxial to my optic.”
3. Choose a discrete marking method that doesn’t bleed. A technique that gives you the most discrete mark for single-degree alignment is best, Dr. Ma says. “I like to use a 30-gauge needle to make a very thin epithelial demarcation on the axis I want to align with in a magnified slit-lamp-based ocular reticle.”1
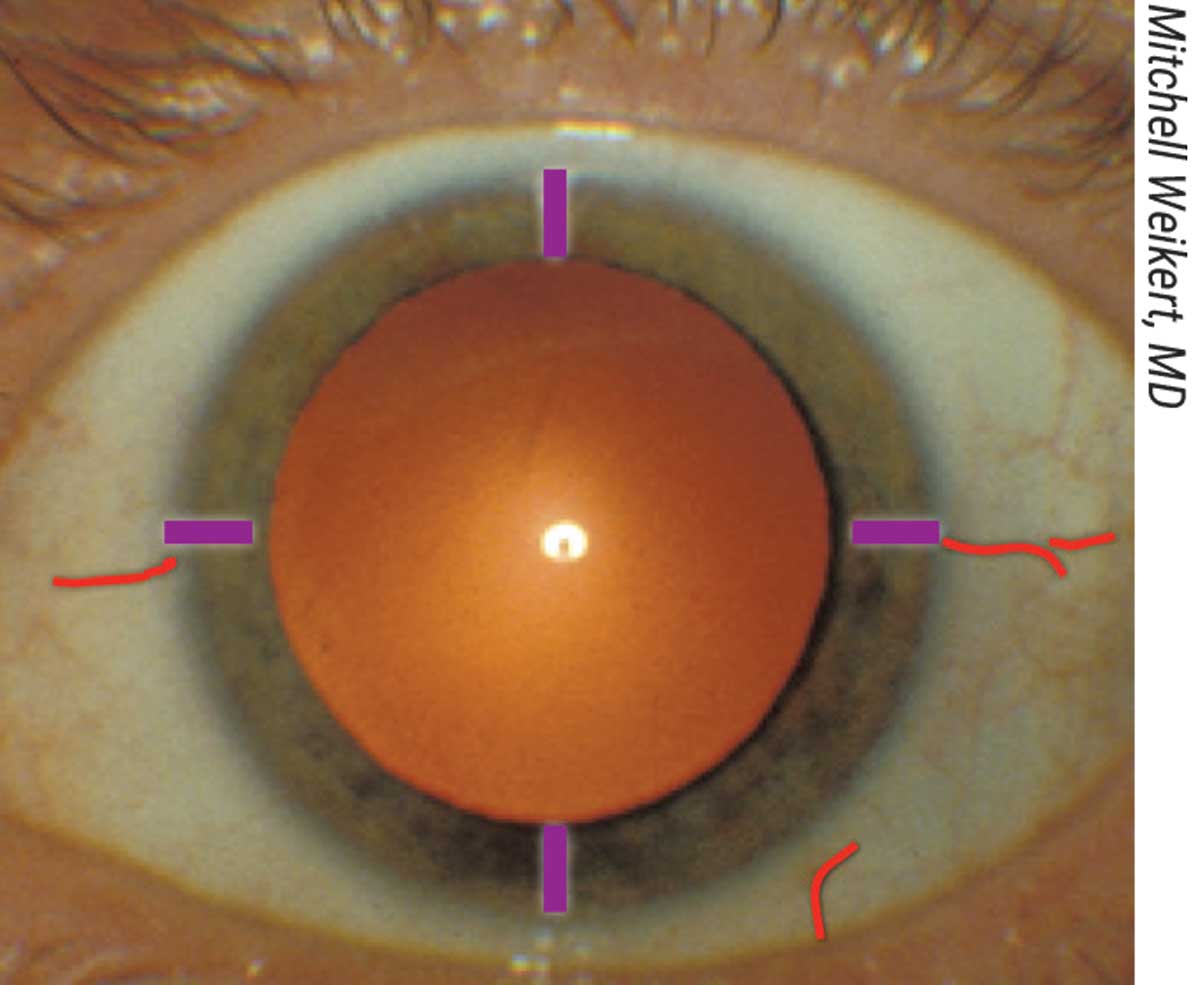 |
| Figure 2. A photo showing the ocular surface landmarks corresponding to in the sketch in Figure 1. |
Some other marking options include the Osher ThermoDot (Beaver-Visitec International) which uses cautery, and the RoboMarker (Surgilum), which is a manual, pre-inked corneal marker with integrated light fixation. James Auran, MD, a professor of ophthalmology at Columbia University’s Irving Medical Center says the RoboMarker’s pigment doesn’t bleed and remains on the eye throughout the entire case. “As with any ink-marking tool, be sure to rock the marker back and forth a bit on the anesthetized eye,” Dr. Auran says. “You can’t assume that if you simply touch the eye the ink will stain. You have to press and rock so each prong indents the tissue. The indentation mark itself can be a helpful guide too.”
4. Recreate your testing conditions. “There’s evidence that a supine versus upright patient position and fixation can cause significant cyclotorsion in certain patients,” Dr. Ma notes.
5. Ensure optical alignment of the microscope during marking and intraoperatively during lens placement. “You may need to tilt or align the head and then align the microscope so they’re parallel,” he says. “Otherwise, you can introduce an element of parallax which may be important, depending on which axis you’re operating at and the axis you’re trying to achieve.”
A Complementary Approach
Digital alignment systems can take an image from any device that performs corneal topography or tomography, such as Pentacam (Oculus), Galilei (Ziemer) or Atlas (Zeiss), and locate a specific reference axis based on the image, explains Dr. Weikert.
“The Verion image-guided system (Alcon) takes a preop reference image and overlays a reticle onto the eye in the microscope’s heads-up display so you can see your marking and toric alignment,” Dr. Weikert says. “Callisto (Zeiss) does a similar thing. It takes the IOLMaster’s measurements and overlays a reticle onto the eye in the OR. You can choose the alignment axis you want for your lens, and it’ll overlay that on the patient’s eye.
“Some people use femtosecond laser platforms to make small corneal marks at the axis of the toric location,” he continues. “Lensar’s IntelliAxis-L System makes two little tags along the axis for the toric IOL when it makes the capsulotomy. You can also use preoperative reference images from a topographer to help with alignment. Others use intraoperative aberrometry, such as the ORA with VerifEye+ (Alcon).” The Cassini Ambient (Cassini) is another option for toric planning with FLACS connectivity to Lensar (Lensar) and Catalys (Johnson & Johnson Vision).
Studies have demonstrated that the use of digital marking tools such as the Verion, and even smartphone apps, can increase the accuracy of manual marking.2-4 Still, experts say that it’s a good idea to use a manual backup method.
“Digital and manual methods are complementary,” says Dr. Ma, who uses several digital methods—including the ORA, the Verion and the Callisto—and a proprietary method, depending on the OR setting or the patient, to double-check his alignment. “You should always have a manual backup method in case you need to make adjustments. This is true anytime computers are involved in medicine.”
For example, digital technologies need to see landmarks such as blood vessels or iris crypts to work. “Dilation can obscure the iris or blood vessel landmarks. Also, some patients have ‘featureless’ eyes, which make it more challenging,” Dr. Weikert notes.
For this reason, photographs are a less reliable backup method than marking, says Dr. Ma. “Most surgeons use a different drop regimen for intraoperative dilation compared to dilation in the clinic,” he points out. “In the OR, a significant number of patients dilate up to 8 or 9 mm, which obscures iris landmarks you may have seen preoperatively. Additionally, the superficial vessels blanche when you add phenylephrine, or may be more difficult to see under the different lighting of a microscope.
“You may also introduce things intraoperatively that affect the machine’s image-recognition software and registration,” Dr. Ma adds. “For instance, it’s very common to put a little viscoelastic on the cornea, but this may upset registration. The same applies if the conjunctiva balloons or if a subconjunctival hemorrhage occurs during a procedure, such as when suction is applied in femtosecond-assisted surgery. You won’t know when the machine registers to the wrong axis if you don’t have a backup method.”
Dr. Ma says a digital method also needs to be flexible. “You need to be able to adjust it to what you want,” he says. “The vast majority of toric lenses we implant are around 1 to 1.5 D, so posterior corneal astigmatism, lens tilt and other factors matter significantly. After doing a proper vector analysis, the axis you want the lens to be at may not be the axis your topographer suggests is the steepest.
“The other reason you need flexibility with digital methods is determining incision location,” he continues. “Your incision can induce a certain amount of astigmatism. If you operate on the axis or 90 degrees away, then your vector calculations are relatively simple. They’re not perfect, because of the little bit of coma you’re inducing, but they’re simpler than if you were to operate on some unusual angle relative to the angle you’re trying to neutralize.”
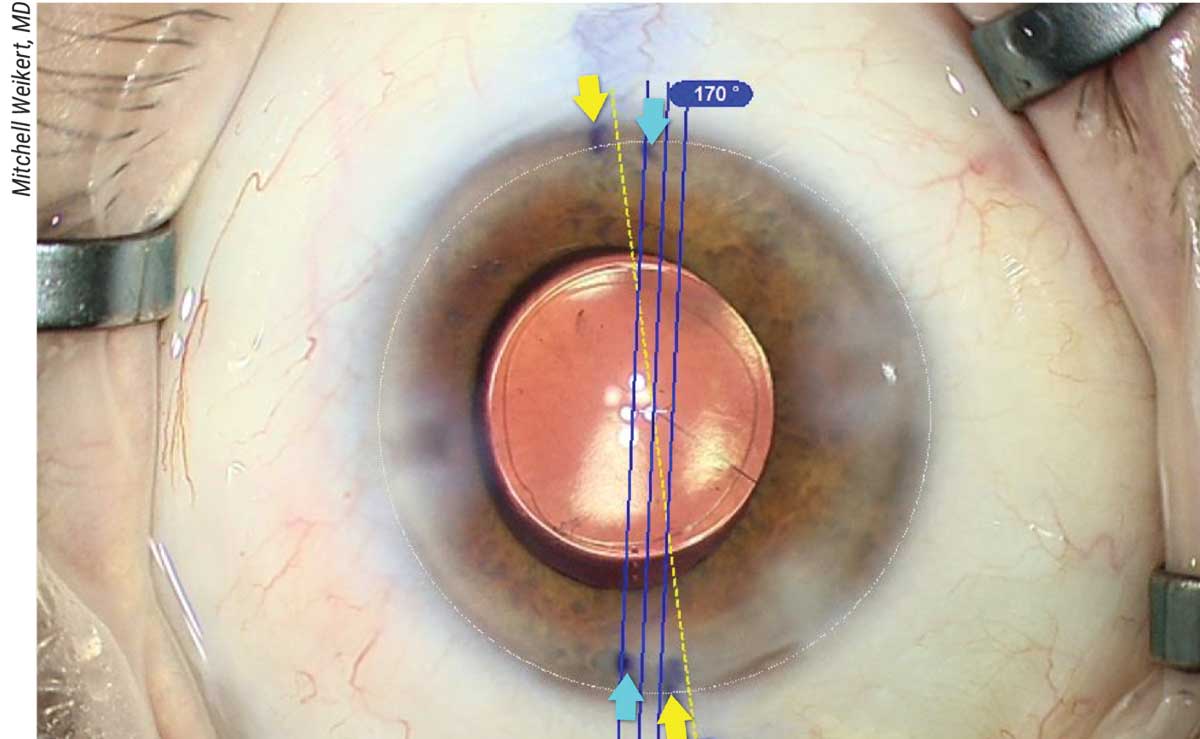 |
| Figure 3. An automated toric marking system compared to manual marking. The yellow arrows correspond to the manual marks for the reference axis; the blue arrows correspond to the manual marks for the toric alignment axis. |
Conflicting Measurements
“Many current digital devices rely on biometry device images to define the steep axis,” says Dr. Ma. “That’s notoriously inaccurate for small amounts of astigmatism and for post-refractive patients, because the part that matters there is the optical zone of laser vision correction.”
Dr. Auran uses a combination of manual marking, IOL Master 700 (Zeiss) or Lenstar (Haag-Streit) and Pentacam to identify the axis. “Occasionally, you may get five different readings from five different machines, or you’ll measure a patient five times and get five different readings,” Dr. Auran says. “When confronted with such variable readings—which is especially common among patients with low amounts of astigmatism, whose more spherical corneas make for less reproducible measurements—you need to use good judgment to figure out exactly which numbers you should use.”
Dr. Ma and his colleagues studied several types of instruments, including Scheimpflug machines (Pentacam and Galilei), keratometry machines (IOL Master, Lenstar and an autorefractor), Placido-ring-based machines (Orbscan, Bausch + Lomb; EyeSys, EyeSys Vision; OPD CT, Nidek) and full-gradient devices (Johnson & Johnson Vision’s iDesign CT) in a small number of eyes (18 eyes of nine volunteers). In the poster, presented at a past ARVO meeting, the researchers concluded, “Full-gradient appears to have a small advantage with respect to repeatability of the magnitude and axis measurements of anterior corneal astigmatism. There were significant differences in intra-device variability between instruments utilizing similar technology; thus, caution should be used with regard to assumptions of equivalence based on methodology.” They add that further study is necessary to confirm their findings and determine any clinical significance.5
Here are some pearls for reconciling the numbers:
• Check the status of the ocular surface. Anything that affects the ocular surface, such as dry eye, epithelial basement membrane dystrophy or Salzmann’s nodular degeneration could affect the quality of your measurements.
• Check how much data was captured. “Look at the metrics provided by the device for assessing the quality of measurements,” Dr. Weikert adds. “Each device will give you some indication of whether it thinks a measurement was of high or low quality.”
• Look for agreement among devices. “We consider at least three different devices—maybe two biometers and a topographer, or one biometer and two topographers,” Dr. Weikert says. We just like to see three different measurements to help determine not only magnitude but location of the astigmatism. Sometimes two agree and one’s a little off. We’d be more comfortable if all three agree, so we’ll try treating the ocular surface and bring the patient back on a different day to remeasure.”
• Don’t put all your eggs in one basket. “Relying on only one device can get you burnt,” Dr. Weikert points out. “Graham Barrett’s toric calculator—the one on the APACRS site, not the one in your device—enables you to enter multiple measurements from different devices. It chooses the median astigmatism values.”
Measuring Central Astigmatism
Central astigmatism management is key for post-refractive patients, but as noted previously, not all devices are equally suited for this. “Oftentimes, because of the flattening in the center of the cornea and the scale on the chosen device, you lose surface curvature details in that area,” Dr. Weikert says. “You can try changing the scale on your topographer or tomographer to see if you can highlight the central astigmatism a bit better.”
He says the Lenstar and IOLMaster 700 measure the central 2.5-mm zone of the cornea. “Devices like Atlas or Pentacam will give you steep and flat meridians in different zones of the cornea, and you can isolate the central zone with those devices,” he notes. “Focus on central astigmatism as opposed to something like sim-K, because that starts to get in the 3- to 4-mm zone, depending how steep or flat the cornea is. Sometimes it’ll average out the astigmatism or under-call it compared to when you look centrally for astigmatism.”
“I get a lot of variability with Pentacam when I measure one patient several times, but it’s a good guide, and Pentacam gives you central corneal readings,” says Dr. Auran. “That’s most valuable. Determine the axis in the central area over the pupil and whether there’s a difference between the central astigmatism and peripheral astigmatism.”
To measure central astigmatism with Pentacam, Dr. Auran recommends the credit card method, devised by Robert Osher, MD. “Pentacam doesn’t provide you with this number, so you have to measure it yourself,” he explains. “Dr. Osher would look at Pentacam’s curvature map and line it up with a credit card—just eyeballing it—to get an idea of the central astigmatism. From this you can reliably see the orientation of the astigmatism in the central 3 to 4 mm.”
He says that checking the patient’s spectacles can give you an indication of central astigmatism. “It’s not always helpful, but you should still factor it in,” he says. “Spectacle astigmatism is the sum of the warping of the cornea and warping of the lens. If the patient comes in with no astigmatism correction in their glasses and autokeratometry says they have 2 D of astigmatism, you’d better be sure those 2 D are in the central cornea. There might be other factors involved, and the most unhappy patient on earth is one who had no astigmatism in spectacles before cataract surgery; the doctor implants a 2-D correcting lens and they end up with 2 D of astigmatism they didn’t have before.”
 |
| Figure 4. Joseph Ma, MD, uses a slit lamp eyepiece with an embedded angle-measuring reticle. He uses a 30-gauge needle to mark the axis with superficial epithelial abrasions. |
Tips for Success
Whether you use a manual or digital approach, or both, experts offer the following tips:
• Be meticulous. “Checking your accuracy is key,” Dr. Auran says. “Generally, you’re within the range of error, but there’s still some noise due to lens labeling and variability in measurements. Keep in mind that if you have a patient whose astigmatism varies, say, ±0.25 D over two years, that’s not uncommon. It can happen for a variety of reasons, including epithelial edema, how much adrenaline is in their system, or diurnal curves—morning measurements might be different than afternoon ones.”
• Always have a feedback loop in whatever you do. “You should have a way of figuring out where you went wrong,” Dr. Ma says. “Was it a problem with measurements, with marking or with the execution? We developed a formula that enables us to figure this out based on the refraction. It calculates the axis to which you should have aligned the IOL.”
• Manage patient expectations. “If I have reliable readings, I tell patients we’ll do pretty well, but if I have a patient with conflicting or variable readings, I lower their expectations,” Dr. Auran continues. “I tell patients with low astigmatism that we hope to get at least 0.75 D of their astigmatism resolved and hope we do even better. Small amounts of astigmatism such as 0.75 D will give you more variability in the axis and magnitude measurements. It’s much less precise with these patients.”
He points out that if your patient has dry eye, you should lower their expectations as well. “Dry eye can really throw off your measurements,” he says. “But you often hear it said, ‘control the dry eye and then take measurements and put that lens in.’ That lens will work when the patient is fully optimized, but they weren’t fully optimized when they came in, and they won’t be after they leave. You may have corrected them with a fully optimized eye, but back in the real world, dry eye is going to cause more symptoms and affect the corneal shape. So, lowering expectations is critical.”
• Demonstrate the outcome with a spectacle lens. Dr. Auran says that showing patients their potential lens outcome can be more effective than describing it to them. “Anything you discuss preoperatively is an anticipation, and anything you don’t discuss is a complication,” he says. “If you’ve prepared them for the lens not being quite as accurate, they’re not so bothered.”
A small amount of residual astigmatism works in a patient’s favor because it gives them increased depth of field, he notes. “If you remove every bit of astigmatism, they may have a narrower field of view. They may say, ‘Before, I used to be able to see far away and read on a computer, and now I can see far away but I can’t see the computer. What did you do?’ I took away their astigmatism.”
Dr. Auran demonstrates the visual outcome of the toric lens using spectacles. “This is a great step to add to your workup,” he says. “If the patient says it’s a big difference, they have a reason to get a lens. If they’ve never worn spectacles and you take away the small increase in depth of field they get from their small amount of astigmatism, they might be unhappy.”
Dr. Chayet is considered a pioneer in refractive and cataract surgery, and is the medical director of the Codet Vision Institute in Tijuana, Mexico. He is a clinical investigator for RxSight, LensGen and ForSight Vision6.
1. Ma JJK, Tseng SS. Simple method for accurate alignment in toric phakic and aphakic intraocular lens implantation. J Cataract Refract Surg 2008;34:1631-1636.
2. Elhofi AH and Helaly HA. Comparison between digital and manual marking for toric intraocular lenses. Medicine (Baltimore) 2015;94:38:e1618.
3. Lin H, Fang Y, Chuang Y, et al. A comparison of three different corneal marking methods used to determine cyclotorsion in the horizontal meridian. Clin Ophthalmol 2017;11:311-315.
4. Khatib ZI, Haldipurkar SS, Shetty V. Verion digital marking versus smartphone-assisted manual marking and isolated manual marking in toric intraocular lens implantation. Indian J Ophthalmol 2020;68:3:455-458.
5. Ma JJK, Law CCY, Zhu A. Comparative measures of corneal power and internal astigmatism utilizing full-gradient topography, Placido-disk topography, Scheimpflug imaging, slit-scan imaging, anterior segment optical coherence tomography, wavefront aberrometry and keratometry with eleven different devices. Poster presented at ARVO, April 2014.