If you've ever attended the American Society of Cataract and Refractive Surgery's Film Festival Awards and wondered how the nominees assembled those polished videos with titles, music and slick scene transitions, wonder no further. Most likely, they were edited on a PC or Macintosh computer using software you can buy off the shelf. Here are the main considerations to keep in mind if you'd like to turn your surgical videos into professional-looking films.
Capturing the Video
If you have an existing analog video camera with which you record surgical videos onto videotape, you need to transfer the analog recordings to digital so you can later edit them on your computer. What we've done for several surgical suites at our practice is purchase a digital tape recorder called a Mini-Digital Video tape deck. These are available from manufacturers such as Sony and JVC for around $300 and higher. You just connect the analog feed from your camera to the DV tape deck, and as you shoot your video it's automatically transformed into a digital signal and saved on a Mini-DV tape.
We also have Mini-DV systems with two decks: the Mini-DV on one side and a Super VHS on the other. This allows us to make copies from S-VHS tapes onto the digital medium. This is a good way to make digital copies of your existing surgical recordings if you've been shooting them with Super VHS for a while.
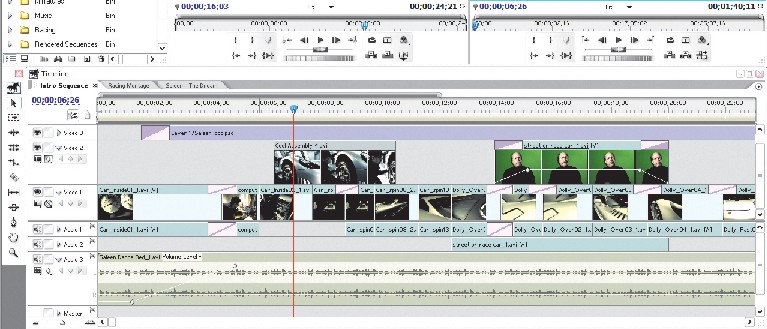 |
| Figure 1. Adobe's Premiere and Pinnacle Software's Liquid Edition allow the user to add elements to a segment at a particular time point by stacking them, which reflects how those elements will appear in the film. |
Another way to start, if you don't have a surgical camera yet, is to purchase a DV camera and hook that to your surgical microscope. This way, your original signal is digital. Then, after surgery, you can connect this camera directly to your PC with what is called a FireWire connection, which allows the rapid transfer of large files, such as video and audio. If you plan to go this route, it's important that you determine two things before you buy your camera: first, that it has a FireWire output port; second, that it's compatible with the video editing software you plan to use, since there are some earlier systems that are not, though this is becoming less of a problem. The makers of video editing software, which we will discuss shortly, list compatible equipment on their websites.
Transferring the Video
Since you're going to be transferring the video from the Mini-DV tape to your computer's hard drive using a FireWire connection, you need to make sure your computer can receive it. If you have a Macintosh computer or a new PC, it may already have a FireWire connection. If not, you need to purchase a Microsoft-compliant FireWire card, which costs about $30. Installing the card, however, entails taking the case off of the computer. If you don't feel comfortable doing this, you could have a computer repair shop in your area do it for a small fee, since the installation isn't too involved.
The more difficult challenge lies on your computer hardware end, since video files are large and can tax your PC to its limits. If your computer is relatively old or you're just not sure if it can handle video, the best thing to do is, again, visit the homepage of the video editing software you want to use and see what certified equipment (such as video display cards and processor chipsets) they prefer and try to purchase that. This isn't as much a problem with Macintosh computers, since they're all made with handling video in mind.
There are some general equipment guidelines we can recommend here, however. You can never have too much RAM when dealing with videos, so you should have a minimum of 1 GB. You should have as much hard disk space as possible, too. The best thing to do is have a completely separate hard drive for storing and working with your video, not the drive where your operating system, such as Windows XP, normally runs. This prevents your operating system's hard drive from becoming fragmented from the interminable saving and erasing that occurs as you edit video. This fragmentation could hurt the overall performance of your computer. It's also good to have a fast processor, such as a 2-Ghz or faster Pentium IV.
Editing Your Masterpiece
Now that the video is on your system, you can use video editing software to construct a professional-looking film. The two most popular software programs, and we've used both, are Adobe Premiere (around $600; adobe.com) and Pinnacle Software's Liquid Edition (around $500; pinnaclesys.com). Here are some of their similarities, differences and the features you'll most likely use.
Both use a timeline function for constructing a film, which is a horizontal line that moves from the beginning of your film to the end from left to right. You create your movie by putting the earliest element on the far left and working from there. You add elements to a segment at a particular time point by stacking them, which reflects how those elements will appear in the film (See Figure 1). For instance, a text title would go a track higher, or be stacked on top of, the video that it runs over. Using this timeline motif, you can add any element you want, such as titles or an arrow that points to a feature of interest on the patient's eye.
A strength of Liquid Edition is that it continually saves your work, so if your computer crashes you don't lose anything. With Premiere, if you don't deliberately save your work as you go, you can lose a lot in a system crash.
The good thing about Premiere, however, is that its maker frequently adds new features and updates, and it is very well-integrated with Adobe's other popular products such as PhotoShop. Also, interfaces are similar across its family of programs, so if you know how to use Premiere, PhotoShop is easier to learn.
Both systems have dozens of different transitions you can use to go from one scene to another, as well as a myriad of ways you can alter a particular transition. For example, you can dissolve from one scene to the next, and tell the computer how many seconds the fade should last. Or you can do what's called a "clock wipe," in which the invisible hand of a clock wipes the screen in a circular motion, erasing the old image and replacing it with the next one, implying to the audience that time has passed between the scenes.
You can also take some video and shrink it into a small window that will run in the corner of the main movie, sort of like the picture-in-picture feature of some televisions. Surgeons can use this to show the phaco machine settings while the main video shows the surgery itself, for example.
Once you're happy with the video, we recommend saving it in the Windows Media Video (.wmv) format. This is useful for e-mailing, webstreaming or, at highest quality setting, for reducing file size for storage. To burn it to a DVD for playback later, save it as MPEG-2.
Making and editing your own surgical videos can be very rewarding, and even a little addictive once you dig into the various transitions, titles and special effects. However, when the lights go down and your audience is drawn into your film, all the time you spent on it will be well worth it.
Dr. Nordlund, a surgeon at the Cincinnati Eye Institute and Mr. Redder, a video consultant for CEI, are co-instructors at an American Academy of Ophthalmology course on video editing developed by CEI's Scott Burk, MD, PhD.